GPS Tracker Installation Guide: A Professional Resource for NZ Fleets
A single loose connection or a poorly positioned antenna can cost a New Zealand fleet operator upwards of $500 in lost productivity and emergency technician call-out fees per vehicle. Following a professional gps tracker installation guide ensures you avoid these common pitfalls that often turn a hardware rollout into a significant logistical headache.
A single loose connection or a poorly positioned antenna can cost a New Zealand fleet operator upwards of $500 in lost productivity and emergency technician call-out fees per vehicle. Following a professional gps tracker installation guide ensures you avoid these common pitfalls that often turn a hardware rollout into a significant logistical headache. You've likely invested in telematics to gain clarity, yet the fear of flat batteries or inaccurate data frequently creates unnecessary friction for your maintenance team.
It's essential to balance technical performance with regulatory requirements to protect your business and your drivers. This resource provides the technical framework you need to ensure every device is secure, hidden, and fully compliant with the NZ Privacy Act 2020. We focus on professional standards that protect your vehicle's electrical integrity while delivering the precision required for high-level fleet management.
This guide covers everything from selecting the right mounting locations to avoiding common wiring mistakes that lead to signal interference. We'll walk you through the process of achieving reliable real-time tracking with minimal vehicle downtime, ensuring your investment delivers value from the moment the ignition turns over.
Key Takeaways
- Identify the most suitable hardware for your NZ fleet by comparing the long-term security of hardwired trackers against the rapid deployment of OBD-II devices.
- Understand critical technical preparations, including safe battery disconnection and the verification of constant 12V/24V versus ignition-switched power sources.
- Follow this professional gps tracker installation guide to establish secure mounting positions and solid ground connections for reliable data transmission.
- Optimise device performance by avoiding signal shadows and ensuring internal antennas are correctly oriented toward the sky for maximum uptime.
- Execute professional testing protocols, such as real-time dashboard verification and physical shake tests, to guarantee installation integrity and compliance.
Understanding GPS Tracker Types for NZ Commercial Fleets
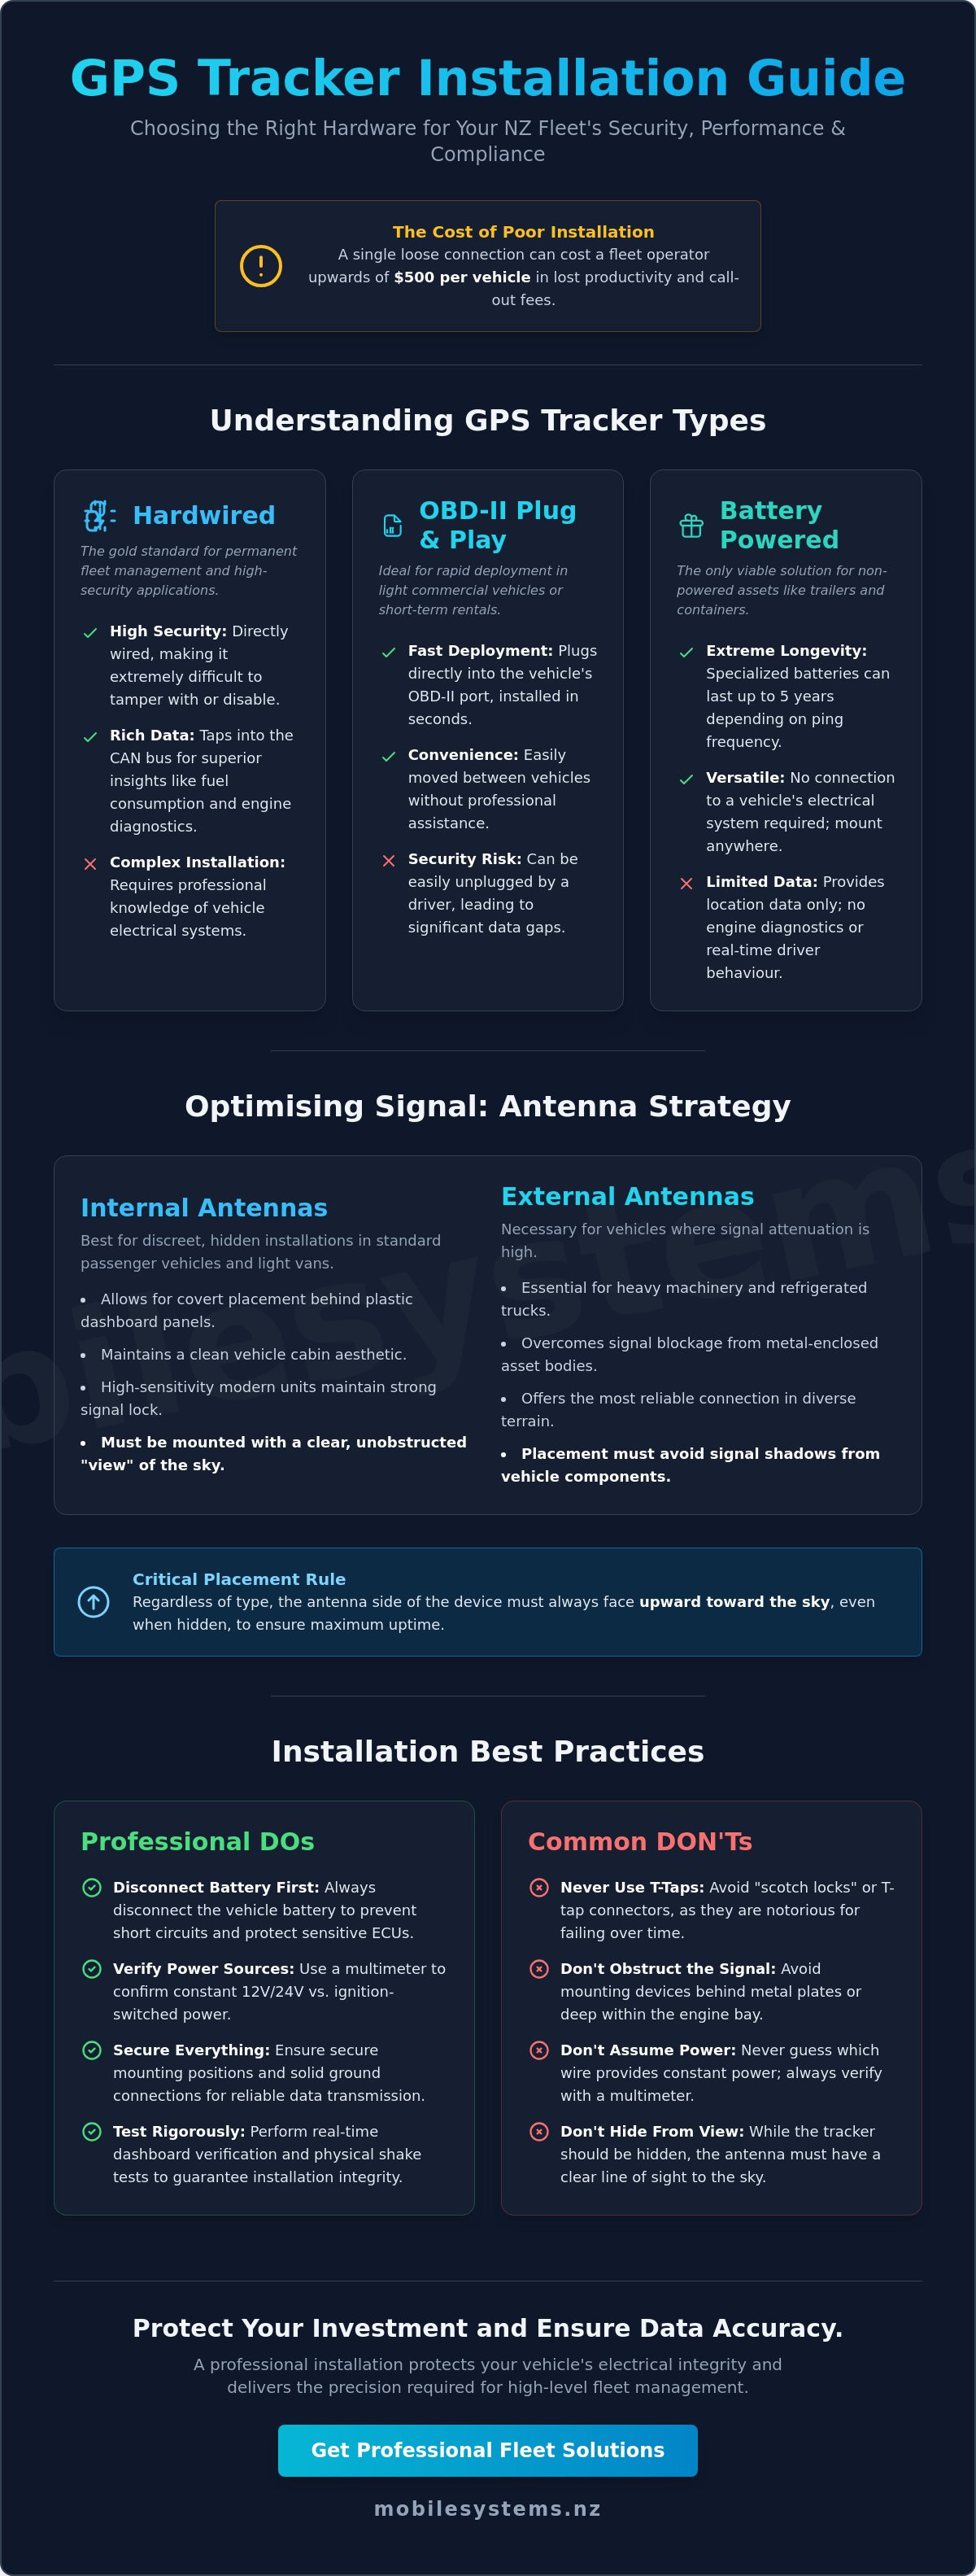
Selecting the right hardware is the foundational step in any professional gps tracker installation guide. New Zealand businesses must balance the requirement for granular data with the practicalities of their specific vehicle types and security needs. A comprehensive overview of vehicle tracking systems reveals that hardware choice dictates everything from data transmission frequency to long-term tamper resistance.
To better understand the physical installation process for these devices, watch this helpful video:
Hardwired units remain the gold standard for permanent fleet management. These devices connect directly to the vehicle's ignition and power circuits, making them difficult to disable without professional tools. In contrast, OBD-II plug-and-play units offer rapid deployment for short-term rentals or light commercial vehicles. However, the trade-off is security. A driver can unplug an OBD-II device in seconds, leading to significant data gaps and security vulnerabilities.
Hardwired vs. Plug-and-Play: Which fits your business?
Hardwired units provide superior insights into fuel consumption and engine diagnostics by tapping into the vehicle's CAN bus system. This level of detail is essential for NZ transport companies aiming to reduce operational costs and monitor driver behaviour accurately. While OBD-II devices are convenient, they lack the permanence required for high-security applications where theft recovery is a priority.
For non-powered assets like shipping containers or trailers parked in remote Kiwi depots, standalone battery-powered trackers are the only viable solution. These cellular devices often feature specialized batteries designed to last up to 5 years on a single charge, depending on the ping frequency. They don't require a connection to the vehicle's electrical system, making them ideal for assets that spend long periods unhitched.
The Role of Internal vs. External Antennas
Modern GPS units often feature high-sensitivity internal antennas. These allow for a discreet "hidden" installation behind plastic dashboard panels where they still maintain a clear view of the sky. This helps prevent tampering and maintains the aesthetic of a clean vehicle cabin. However, internal antennas have limitations when signal obstruction is a factor.
- Internal Antennas: Best for standard passenger vehicles and light vans where the device can sit under plastic trim.
- External Antennas: Necessary for heavy machinery, refrigerated trucks, or metal-enclosed assets where signal attenuation is high.
- Placement Strategy: Always ensure the antenna side of the device faces upward toward the sky, even when hidden.
Achieving a balance between aesthetic placement and signal reliability ensures your fleet remains visible across the diverse terrain of New Zealand. A tailored assessment of your specific vehicle type often prevents costly mistakes during the rollout of a gps tracker installation guide protocol.
Technical Preparation and Essential Tool Kit
Safety is the primary priority for any fleet technician. Before you begin the physical installation, you must disconnect the vehicle battery. This simple step prevents accidental short circuits and protects sensitive Electronic Control Units (ECUs) from voltage spikes. Modern NZ fleet vehicles rely on complex computer systems that are easily damaged by improper handling.
Professional installers never use "scotch locks" or T-tap connectors. While these are common in DIY kits, they're notorious for failing under the vibration levels typical of New Zealand's rural roads. These connectors pierce the wire insulation, which leads to copper oxidation and eventual signal failure. Instead, use a "strip and wrap" method secured with high-quality solder or professional-grade crimping tools and heat-shrink tubing. Following a structured gps tracker installation guide ensures your fleet remains operational without intermittent data gaps.
Your essential tool kit must include a high-impedance digital multimeter, precision wire strippers, and a ratcheting crimp tool. Don't rely on test lights, as they can draw enough current to trigger airbag deployment in newer vehicles. High-quality heat-shrink tubing is also necessary to seal all connections against the moisture and dust common in local industrial environments.
Mapping the Vehicle Electrical System
Use your multimeter to identify three critical connection points. First, find a clean, unswitched 12V or 24V power source that provides constant energy even when the engine is off. Second, locate a reliable ground point on the vehicle chassis. Avoid using existing small-gauge wires for grounding; a dedicated bolt to the metal frame is always superior. Finally, identify the ignition sense wire. This wire only shows voltage when the key is in the "on" or "run" position. This allows the tracking platform to accurately report engine hours and trip starts.
All electrical modifications must align with New Zealand's official vehicle standards to maintain compliance and safety. Incorrectly tapping into safety-critical circuits can void manufacturer warranties or affect Certificate of Fitness (CoF) inspections.
Hardware Verification Before You Begin
Confirm the device is ready for service before you tuck it behind a dashboard. Check that the SIM card is activated and verify the cellular signal strength at your specific site. Many installers lose hours troubleshooting a "dead" device that simply hadn't been provisioned by the provider. Update the device firmware to the latest version while you still have easy access to the USB port or Bluetooth interface.
Documentation is the final step of preparation. Record the IMEI number and the vehicle ID or registration plate. Take a photo of the device label and the final wiring layout. This data is essential for the tracking platform setup and future maintenance. If you're unsure about the electrical architecture of a specific heavy vehicle, a tailored assessment from a specialist often prevents costly technical mistakes.
Step-by-Step Installation: Hardwired and OBD-II
Executing a precise gps tracker installation guide requires more than just connecting wires; it demands a methodical approach to ensure long-term reliability. A professional installation protects the vehicle's electrical integrity while ensuring the device remains hidden from unauthorized tampering.
Step 1: Locate a secure mounting position. Find a space behind the dashboard or interior trim. Avoid placing the device directly under large metal surfaces, as this can shield the GPS antenna and degrade signal accuracy by up to 40%.
Step 2: Establish a solid ground connection. Connect the ground wire directly to a clean, unpainted part of the vehicle chassis. Poor grounding creates electrical "noise" that can cause data packets to drop or sensors to report erratic values during transit.
Step 3: Connect power and ignition lines. Identify a constant 12V or 24V source and a true ignition-switched source. Use soldered joints or high-quality crimps to ensure the connection doesn't vibrate loose over time, especially on NZ's rural roads.
Step 4: Secure the device and cables. Use industrial-grade zip ties to fasten the tracker and excess cabling. This prevents rattling and ensures the internal accelerometer provides accurate driver behaviour data without interference from physical movement.
Best Practices for Hardwiring
Soldering and heat-shrinking are non-negotiable for NZ fleets operating on rough terrain or industrial sites. Mechanical "scotchloks" or T-taps often fail within 12 to 18 months due to vibration and thermal expansion. Soldered joints create a permanent bond that withstands the rigours of heavy-duty use.
- Route all cables away from moving parts like steering columns, brake pedals, or airbag deployment zones.
- Always install an inline fuse, typically 3A to 5A, on the constant power line to protect the device and the vehicle circuit.
- Ensure the fuse is accessible for future maintenance without requiring a full dashboard teardown.
Following a strict gps tracker installation guide prevents common electrical faults that lead to vehicle downtime. It's much cheaper to do the job right the first time than to troubleshoot a loose wire in a remote location.
Utilising T-Harnesses for OBD-II Installs
A T-harness is the preferred method for OBD-II connections because it keeps the factory diagnostic port accessible. This allows technicians to perform servicing or WOF checks without unplugging the fleet hardware. It's a cleaner, more professional solution than a simple direct plug-in.
When using a T-harness, secure the "hidden" end and the tracker deep behind the kick panel. Ensure the device is mounted face-up, even when using an extension cable. This orientation is critical for internal antennas to maintain a clear line of sight to satellites through the plastic dashboard.
For complex fleet requirements or large-scale rollouts, a tailored assessment often prevents costly mistakes during the installation phase. Professional advice ensures your hardware selection matches your specific vehicle types and operational needs.
Optimising Signal Strength and Environmental Protection
Signal reliability is the foundation of any effective fleet management system. A common error in a gps tracker installation guide is overlooking "GPS shadows." These occur when the device is placed directly beneath metal plates or thick wiring looms. Metal effectively blocks satellite signals, leading to data drifts or complete "dead zones" in your tracking history.
For devices with internal antennas, installers must follow the "Label Side Up" rule. The internal patch antenna is usually located directly behind the manufacturer's label. This side should always face the sky through non-metallic surfaces like the dashboard or glass. In New Zealand’s rugged forestry sector, where heavy canopy cover already challenges signal reception, optimal device orientation is non-negotiable for maintaining a consistent lock.
Environmental protection is equally critical for hardware longevity. Trackers should be positioned away from heat sources like heater ducts or engine firewalls. Excessive heat can degrade internal lithium-ion batteries and cause electronic components to fail prematurely. In high-vibration environments, such as heavy machinery or marine vessels, secure the device to a structural member of the chassis rather than a flexible plastic panel.
Waterproofing and IP Ratings for NZ Conditions
New Zealand’s coastal and agricultural environments demand high ingress protection. For external asset tracking on trailers or plant equipment, always specify IP67-rated enclosures. This rating ensures the device remains functional even after temporary submersion and prevents dust entry in dry, rural conditions.
Coastal operations require additional precautions against salt-air corrosion. Applying dielectric grease to electrical connectors prevents moisture from bridging pins and causing short circuits. For agricultural applications, ensure all exposed wiring is protected by UV-stabilised conduit. NZ’s high UV index can cause standard wire insulation to crack and perish within 24 months; this leads to intermittent power failures and costly downtime.
Mounting Stability and Data Accuracy
A secure mount is essential for accurate telematics. Most modern trackers include 3-axis accelerometers to monitor driver behaviour, such as harsh braking or rapid acceleration. If the device is loose or secured only with cable ties, it will vibrate independently of the vehicle. This movement generates "false positive" alerts, which can unfairly penalise drivers and undermine trust in the data.
Use industrial-grade fasteners like 3M VHB (Very High Bond) tape or mechanical mounts for the best results. Once installed, test for electromagnetic interference with existing communication tools. In many NZ fleets, high-power UHF or VHF radios are standard. Ensure the tracker and its cabling are separated from radio antennas by at least 300mm to prevent signal bleed that can disrupt voice communications or corrupt GPS data packets.
A professional gps tracker installation guide ensures your hardware survives the toughest Kiwi conditions. Contact Mobile Systems for expert advice on ruggedized fleet solutions.
Compliance, Testing, and Professional Fleet Support
The final phase of any gps tracker installation guide involves rigorous verification. You shouldn't consider the job finished until you've confirmed the hardware is communicating correctly with your tracking dashboard. Start by triggering a manual ping while the vehicle is outdoors with a clear line of sight to the sky. If the location doesn't update within 30 seconds, check the device's internal LED status to ensure it has acquired both a GPS lock and a cellular connection. Physical stability is just as important as digital connectivity. Perform a "shake test" by firmly tugging on all wiring harnesses and mounting brackets. New Zealand's varied road conditions, from urban motorways to corrugated rural tracks, will eventually loosen any connection that isn't perfectly secure. Using high-quality zip ties and ensuring the device is flush against a solid surface prevents data gaps caused by intermittent power loss.
Legal Obligations for NZ Employers
Compliance in New Zealand is governed primarily by the Privacy Act 2020. You've got a legal obligation to inform your employees if their vehicles are being tracked. This isn't just about privacy; it's also a critical component of the Health and Safety at Work Act 2015. Tracking data provides proof of driver fatigue management and helps locate staff quickly in an emergency. Managing data privacy requires clear protocols on how long tracking history is stored and who within the company can access it. We recommend consulting with a specialist to draft a robust vehicle use policy. This document should clearly state the purpose of the tracking, such as route optimization or theft recovery, to ensure your business remains on the right side of New Zealand's privacy standards.
The Value of Expert Installation Services
While a basic gps tracker installation guide helps with simple setups, professional integration is the best way to prevent warranty disputes. Modern vehicle electrical systems are sensitive. If a DIY installer taps into the wrong wire on a CAN bus system, it can trigger expensive fault codes or even void the manufacturer's electrical warranty. Mobile Systems provides nationwide support for large-scale fleet rollouts, ensuring every unit is installed to a professional standard. This consistency reduces long-term operational costs by eliminating the common wiring failures associated with rushed, in-house jobs. Contact our specialist team
Maximising Fleet Reliability through Precision Installation
Effective hardware integration is the foundation of any successful telematics strategy. Following a structured gps tracker installation guide ensures your devices maintain signal integrity and withstand the unique demands of New Zealand's high-vibration industrial environments.
Mobile Systems Limited provides a distinct advantage with NZ-wide mobile support vehicles and a team of authorized installers for the country's leading fleet hardware. Our technicians specialise in complex deployments where standard consumer-grade setups often fail. We focus on technical compliance and environmental protection to guarantee long-term performance for your commercial assets.
Ensuring your fleet stays connected requires more than just basic wiring. It's about building a robust data network that your business can rely on for years. To ensure your hardware is configured for maximum uptime and accuracy, request a professional fleet tracking consultation today.
Taking the right steps now protects your investment and streamlines your operations across the North and South Islands.
Frequently Asked Questions
Will installing a GPS tracker void my vehicle warranty in New Zealand?
No, installing a GPS tracker won't void your vehicle warranty in New Zealand provided the work is performed to professional standards. Under the Consumer Guarantees Act, a manufacturer can only deny a warranty claim if they prove the installation directly caused the fault. Using a certified technician ensures that your gps tracker installation guide follows best practices, protecting your vehicle's electrical integrity and your manufacturer's coverage.
Where is the best place to hide a GPS tracker in a commercial ute?
The best place to hide a tracker in a commercial ute is deep behind the plastic dashboard trim or high within the A-pillar. These locations provide a clear line of sight to the sky through the glass while remaining invisible to the driver. Avoid placing the unit under heavy metal surfaces or near the engine block, as 85% of signal interference in commercial vehicles stems from poor placement behind metallic shielding.
How much data does a GPS tracker use per month on NZ networks?
A standard fleet GPS tracker typically uses between 5MB and 15MB of data per month on New Zealand 4G or LTE-M networks. This volume accounts for location pings every 30 to 60 seconds and daily status reports. If your fleet operates in high-frequency reporting modes, usage might rise to 30MB. Most NZ providers like Spark and One NZ offer specific M2M data plans tailored for these low-bandwidth requirements.
Can a GPS tracker drain my vehicle battery if the engine is off?
Most modern trackers won't drain your battery because they enter a low-power sleep mode when the ignition is off. A high-quality unit draws less than 5mA during standby, which is negligible compared to the 50mA draw of a standard car alarm. If a vehicle sits idle for more than 21 days, the internal voltage protection in the tracker will automatically shut the device down to preserve enough cranking power to start the engine.
Do I need a professional to install a hardwired GPS tracker?
You should use a professional for hardwired units to ensure the device is integrated safely with the vehicle's electrical system or CAN-bus. Professional installers use fused connections and hidden wiring that prevents tampering or accidental disconnection. While a basic gps tracker installation guide helps with DIY setups, a certified technician from Mobile Systems Limited ensures the device is positioned for maximum uptime and 99.9% signal reliability.
What happens to the tracking signal in remote areas like the West Coast?
In remote areas like the West Coast or Southern Alps, the tracker will store location data in its internal buffer if the cellular signal drops. Once the vehicle returns to a Spark or One NZ coverage area, the device automatically uploads the stored data to the cloud. This ensures no mileage or route information is lost, even if real-time tracking is temporarily unavailable during the journey through deep mountain passes.
Is it legal to track my employees without their knowledge in NZ?
It's generally illegal to track employees without their knowledge under the Privacy Act 2020. You must have a clear GPS tracking policy in place and inform staff that vehicles are being monitored for safety and business efficiency. Transparency is key; 92% of NZ fleet managers report better driver buy-in when tracking is introduced as a tool for health and safety compliance rather than a surveillance measure.
How do I test if my GPS tracker is working correctly after installation?
You test a tracker by checking the Last Seen timestamp on your tracking platform immediately after installation. Perform a short 5-minute test drive to confirm the unit accurately records ignition events, speed, and directional changes. If the breadcrumb trail on the map follows the road exactly, the GPS antenna has a sufficient view of the sky and the installation is successful. A tailored assessment often prevents costly mistakes during this phase.
Related posts

- June 03, 2026
Mobile coverage on New Zealand farmland averages just 57% as of September 2025. This figure hasn't improved since 2022, leaving...

- June 02, 2026
Research indicates that 52% of all construction rework is caused by communication breakdowns, costing the industry billions annually. On a...

- June 01, 2026
Cellular connectivity is a convenience, yet it remains a single point of failure for many New Zealand businesses. With the...