A Guide to Starlink Mounts for New Zealand Businesses
Discover the best Star Link mounts for reliable satellite internet in NZ. This guide covers roof, pole, and vehicle options for commercial operations.
Getting your Starlink setup right from the get-go hinges on one crucial choice: the mount. For any business in New Zealand, from a remote forestry operation using forestry radio to a nationwide logistics fleet, the mounting solution is just as important as the dish itself. Get it wrong, and you're looking at signal drops, weather damage, and costly downtime.
Choosing the Right Starlink Mount for Your NZ Operations
Stable, high-speed internet isn't a "nice to have" for Kiwi businesses anymore; it's essential. The rapid switch to satellite internet NZ proves it. In fact, low earth orbit (LEO) satellite broadband now powers 14 percent of all rural internet connections across the country.
We've seen active users jump from just 12,000 to over 34,000, giving New Zealand the highest number of satellite connections per capita in the OECD. With this massive uptake, picking the right hardware from a specialist supplier has become a critical operational decision. You need expert product knowledge, not a limited range from a general retailer.
Matching the Mount to the Mission
First things first, what's the mission? Is your Starlink going on a fixed office building, a temporary worksite, or a vehicle that's always on the move? Each scenario needs a completely different approach.
To make sense of the options, here's a quick rundown of the most common mount types we see used in commercial settings across New Zealand.
Starlink Mount Comparison for NZ Commercial Use
| Mount Type | Best For | Key Advantage | Considerations |
|---|---|---|---|
| Permanent Roof Mount | Fixed commercial buildings, rural offices, farm sheds. | Maximum stability and security for long-term use. | Requires permanent roof penetration and professional sealing. |
| Versatile Pole Mount | Sites with obstructions like trees, hills, or other buildings. | Elevates the dish for a clear line of sight to the sky. | Needs a solid base; height may increase wind load issues. |
| Heavy-Duty Tripod | Temporary sites, construction offices, events. | Sturdy and non-permanent, easy to set up and take down. | Requires a flat, stable surface and may need ballast for wind. |
| Rugged Vehicle Mount | Logistics fleets, mobile service teams, roading crews. | Designed for vibration and shock; provides on-the-go connectivity. | Must be professionally installed to handle constant motion. |
| Specialised Marine Mount | Commercial fishing vessels, marine transport, charter boats. | Corrosion-resistant materials (stainless steel, etc.) | Engineered to withstand saltwater and constant sea motion. |
Ultimately, the goal is to find a mount that not only fits your location but also stands up to the demands of your specific industry.
Real-World Scenarios in New Zealand
Let's put this into practice. A construction company setting up a temporary site office for a six-month project would likely go for a heavy-duty tripod or a non-penetrating roof mount. This gives them the stability they need without making permanent changes to the structure.
On the other hand, a commercial fishing vessel out of Bluff needs a specialised marine-grade mount. It has to be built from corrosion-resistant materials like stainless steel to handle the harsh saltwater environment and the constant rocking of the sea, often paired with the best VHF marine radio NZ for comprehensive safety.
For those needing to get over or around obstacles—a common problem in forestry and agriculture—a pole mount is the go-to. It lifts the dish high enough to get a clear, unobstructed view of the sky. If you're looking for flexible options here, exploring pole-mounted bracket solutions can open up more possibilities.
And for a nationwide transport company? A professionally installed, rugged vehicle mount like those from RAM Mounts on each truck cab is a must. It guarantees drivers stay connected for logistics, comms, and safety, no matter where they are in the country.
Key Takeaway: Don't treat the mount as an afterthought. It’s a core part of your communication system. A proper assessment of your site and operational needs is the only way to guarantee the performance and reliability your business depends on.
A Practical Guide to Secure Starlink Installation
Getting your Starlink dish out of the box is the easy part. The real work lies in a professional, planned installation that guarantees your connection is secure, weatherproof, and built to last. For any business relying on Starlink, a "good enough" setup just won't cut it.
This guide goes beyond the basic instructions in the box. Think of it as a real-world walkthrough for creating a robust and reliable Starlink installation that you can depend on. We'll cover the critical steps that make all the difference, from nailing the site selection to professional cable management and waterproofing.
Site Selection: The First Critical Step
Before you even think about picking up a tool, the most important decision you'll make is where to place the dish. The goal is simple: a completely unobstructed, 360-degree view of the sky. It's easy to underestimate this, but even small obstructions like a single tree branch or the edge of a roof can cause intermittent signal drops—the kind of thing that’s infuriating for personal use and completely unacceptable for business operations.
Get the Starlink app out and use the "Check for Obstructions" tool. Don't just check one spot; walk around the property and scan multiple potential locations. And think long-term. That small tree might look fine now, but what about in a few years? The best spot is usually the highest point of the building, like a roof peak, but you also need to balance this with safe and practical access for any future maintenance.
The flowchart below breaks down the basic process for getting your mount selected and installed correctly.
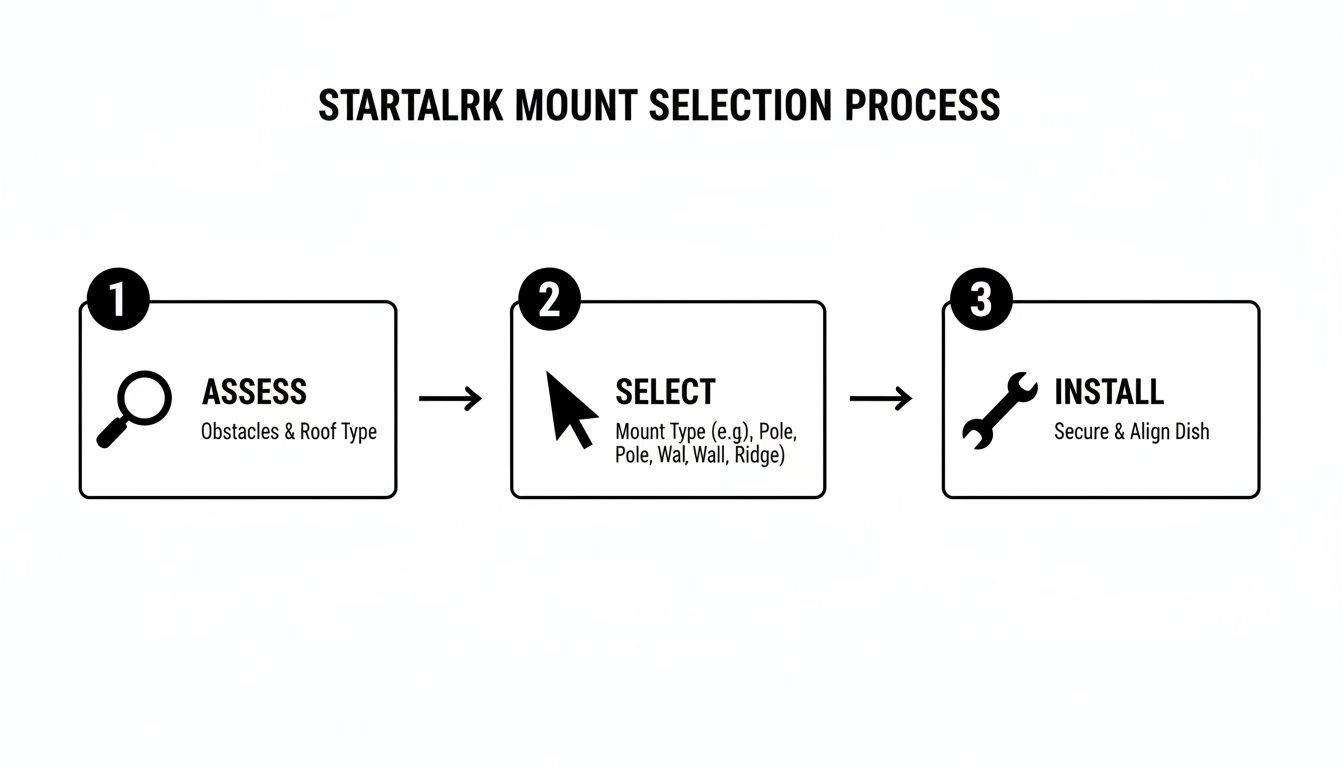
This really simplifies the journey from your initial assessment to a fully functional installation, highlighting that choosing the right mount is just as important as the physical work itself.
Fastening Mounts to Common NZ Building Materials
Securing your Starlink mount properly is non-negotiable. The method you use comes down entirely to what your building is made of.
-
Corrugated Iron Roofing: A classic on many commercial and rural buildings in New Zealand. You must always fasten through the high points (the crests) of the corrugations, never in the valleys where water channels. Use proper roofing screws that have bonded neoprene washers to create a watertight seal. The critical part is to make sure you're drilling into the purlins or roof trusses underneath—not just the thin metal sheet.
-
Timber Framing: If you're mounting to a wall or a fascia board, you have to find the studs or rafters. A stud finder is your best friend here. Once located, use appropriately sized lag bolts to ensure the mount can handle the dish's weight plus whatever a heavy wind load throws at it. Never, ever rely on the cladding alone to hold it.
-
Internal Walls: While you won't mount the dish inside, you'll definitely be mounting internal hardware. If you're planning a setup in an office or home, knowing the best fixings for plasterboard walls can save you a lot of headaches and keep everything stable.
Professional Cable Routing and Waterproofing
A messy cable run isn't just an eyesore; it's a future failure waiting to happen. The Starlink cable needs protection from physical damage, UV rays, and moisture.
Run the cable along logical paths, like under the eaves or along framing, and secure it with UV-resistant clips every 50-60cm or so. Avoid any sharp bends or kinks, as they can easily damage the delicate wiring inside.
If you have to pass the cable through a wall or roof, that penetration point is your biggest risk for leaks. Always drill the entry hole on a slight downward angle heading outside—this uses gravity to stop water from travelling inwards. After the cable is through, you must seal the hole from the outside. Use a high-quality, UV-stable silicone sealant or, even better, a purpose-made cable entry gland. This small detail is what prevents costly water damage down the line.
To see more of these professional techniques in action, check out our detailed guide on Starlink installation.
With Starlink now available right across New Zealand, covering both the North and South Islands, it’s reaching remote spots where decent internet was once a pipe dream. It's not uncommon for our customers to see speeds over 100 Mbps with near-perfect reliability, and a professional installation is the key to unlocking that full potential.
Advanced Mounting for Mobile and Marine Applications
Starlink isn't just for fixed locations. For New Zealand's dynamic industries—from transport and civil construction to maritime services and tourism—reliable connectivity on the move is a game-changer. This is where specialised mobile and marine Starlink mounts come into play, taking installations far beyond the standard and into the realm of high-performance, purpose-built solutions.
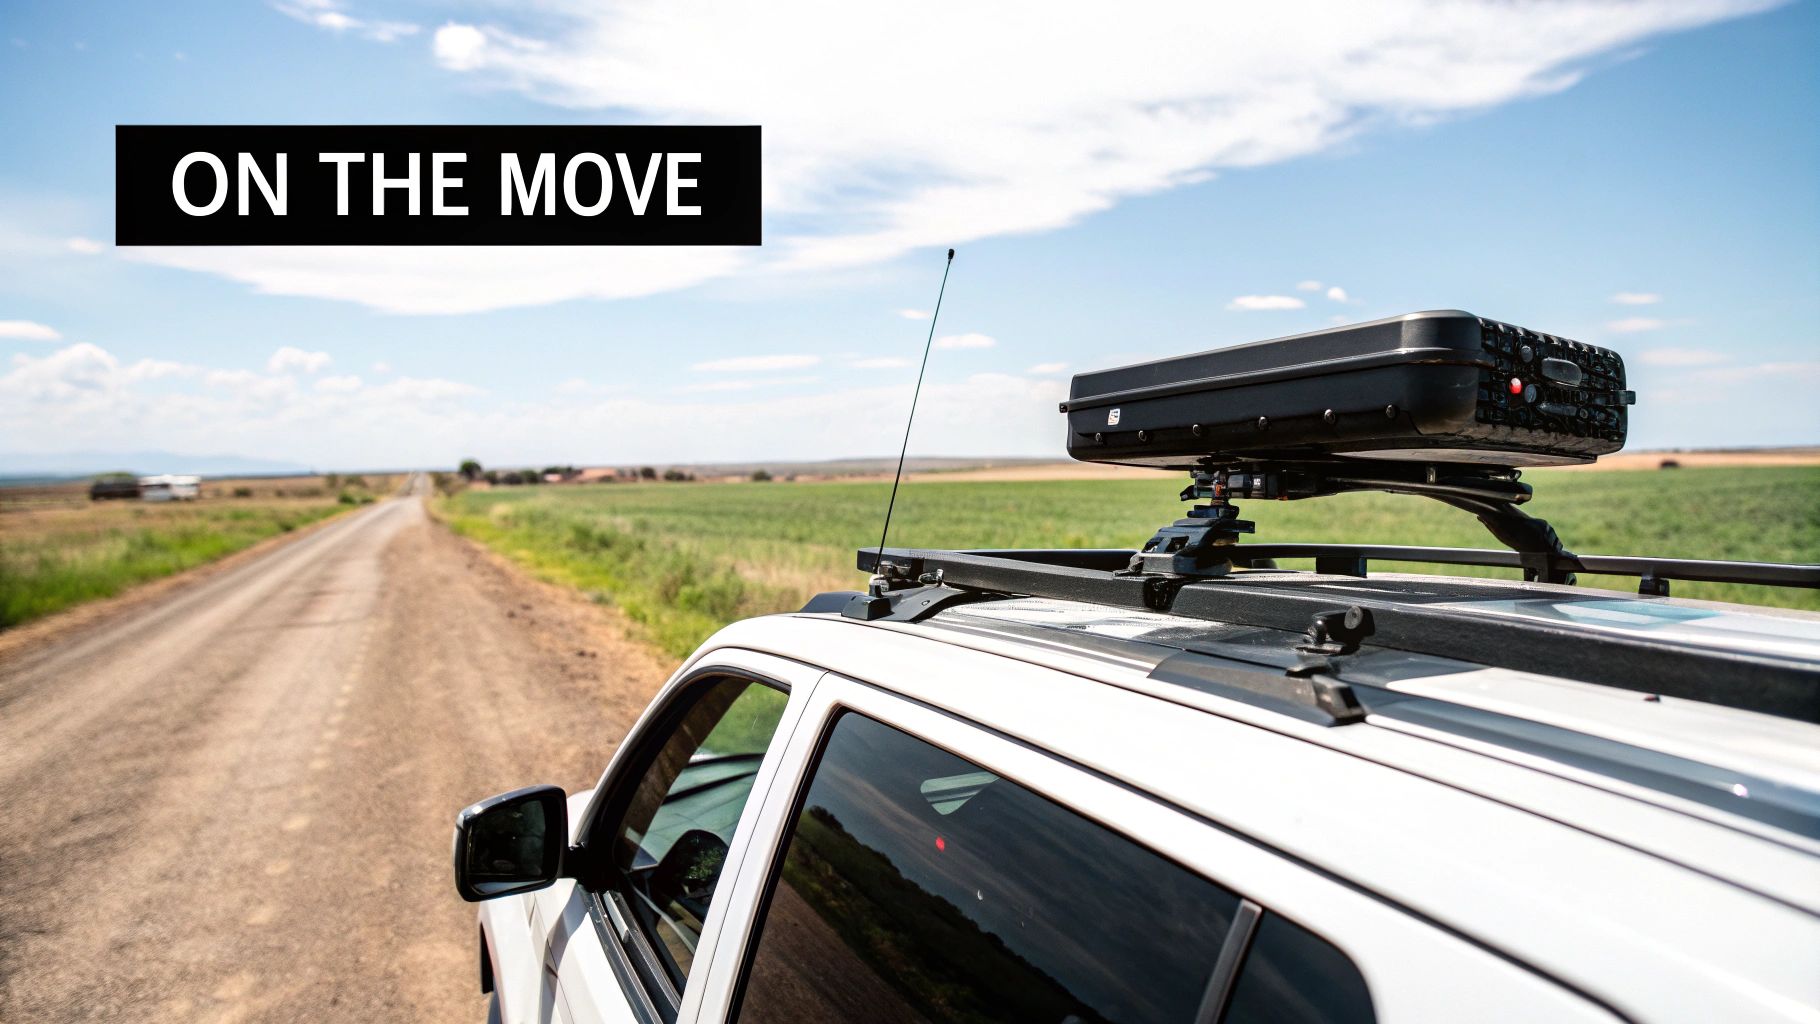
Unlike a static setup on a building, a mobile installation has to put up with constant vibration, shocks, and movement. For commercial fleets, 4WDs, and service trucks, this demands robust mounting systems engineered to absorb these forces without messing with the dish's alignment or stability.
Vehicle Solutions for Uninterrupted Performance
Getting a stable connection while driving or parked up at a temporary worksite is all about the quality of the mount. Brands like RAM Mounts design solutions specifically for these harsh environments, using materials and engineering that can handle the punishment of Kiwi backroads and demanding job sites.
A good vehicle mount is designed to:
- Absorb Vibration: They use rubberised ball joints and clever dampening tech to protect the sensitive electronics inside the Starlink dish.
- Offer Quick Deployment: This lets field teams get their connection up and running—and packed down again—quickly and securely.
- Maintain Signal Lock: The mount has to be rigid enough to keep the dish aimed correctly, even when the vehicle is bouncing over uneven terrain.
This kind of reliable, on-the-go internet is absolutely crucial for logistics, remote project management, and keeping workers safe in isolated areas.
Expert Tip: For any vehicle-mounted Starlink, cable management is just as critical as the mount itself. Make sure all wiring is secured away from moving parts, protected from abrasion, and has drip loops to stop water from getting in. We always recommend a professional installation to sidestep electrical issues and ensure everything lasts.
Marine-Grade Mounts for the Saltwater Environment
The maritime environment is one of the toughest tests for any piece of electronic gear. Salt spray is incredibly corrosive, and the constant motion of a vessel at sea puts immense stress on any fixture. Standard Starlink mounts just aren't built for it.
For fishing fleets, tourism operators, and commercial vessels, a marine-grade mount is non-negotiable. These are typically built from high-grade 316 stainless steel or powder-coated marine-grade aluminium to fight off corrosion. These pair perfectly with communication devices like an Entel or Uniden VHF marine radio.
Their design also accounts for the pitch and roll of a boat, ensuring the dish stays stable and secure even in rough seas. For anyone needing dependable internet offshore, investing in a purpose-built marine mount protects your gear and guarantees the connection stays live when you need it most. You can dive deeper into how this technology is transforming maritime operations in our guide on Starlink for Marine connectivity.
Adaptable Solutions for Temporary Deployments
Not every mobile setup needs to be bolted permanently to a vehicle or vessel. Roading crews, event managers, and emergency response teams often need a solid connection at temporary sites for short bursts of time.
In these scenarios, heavy-duty tripods or magnetic mounts offer a perfect mix of stability and portability. They allow for a rapid setup on any reasonably flat surface, providing a solid base for the Starlink dish without needing permanent fixings. This flexibility is key for teams that are constantly on the move and need consistent, high-speed internet wherever the job takes them.
This mobile connectivity is becoming more and more vital. Starlink's direct-to-mobile service through One NZ has already seen a massive uptake, with over 7 million text messages sent via its network since launch. This service now covers about 40 percent of New Zealand's landmass where conventional mobile coverage doesn't exist, proving just how valuable it is for remote team coordination and safety. You can get more insights on Starlink's impact on NZ mobile coverage over at TelcoNews.
Ensuring Your Install Lasts in Tough NZ Conditions
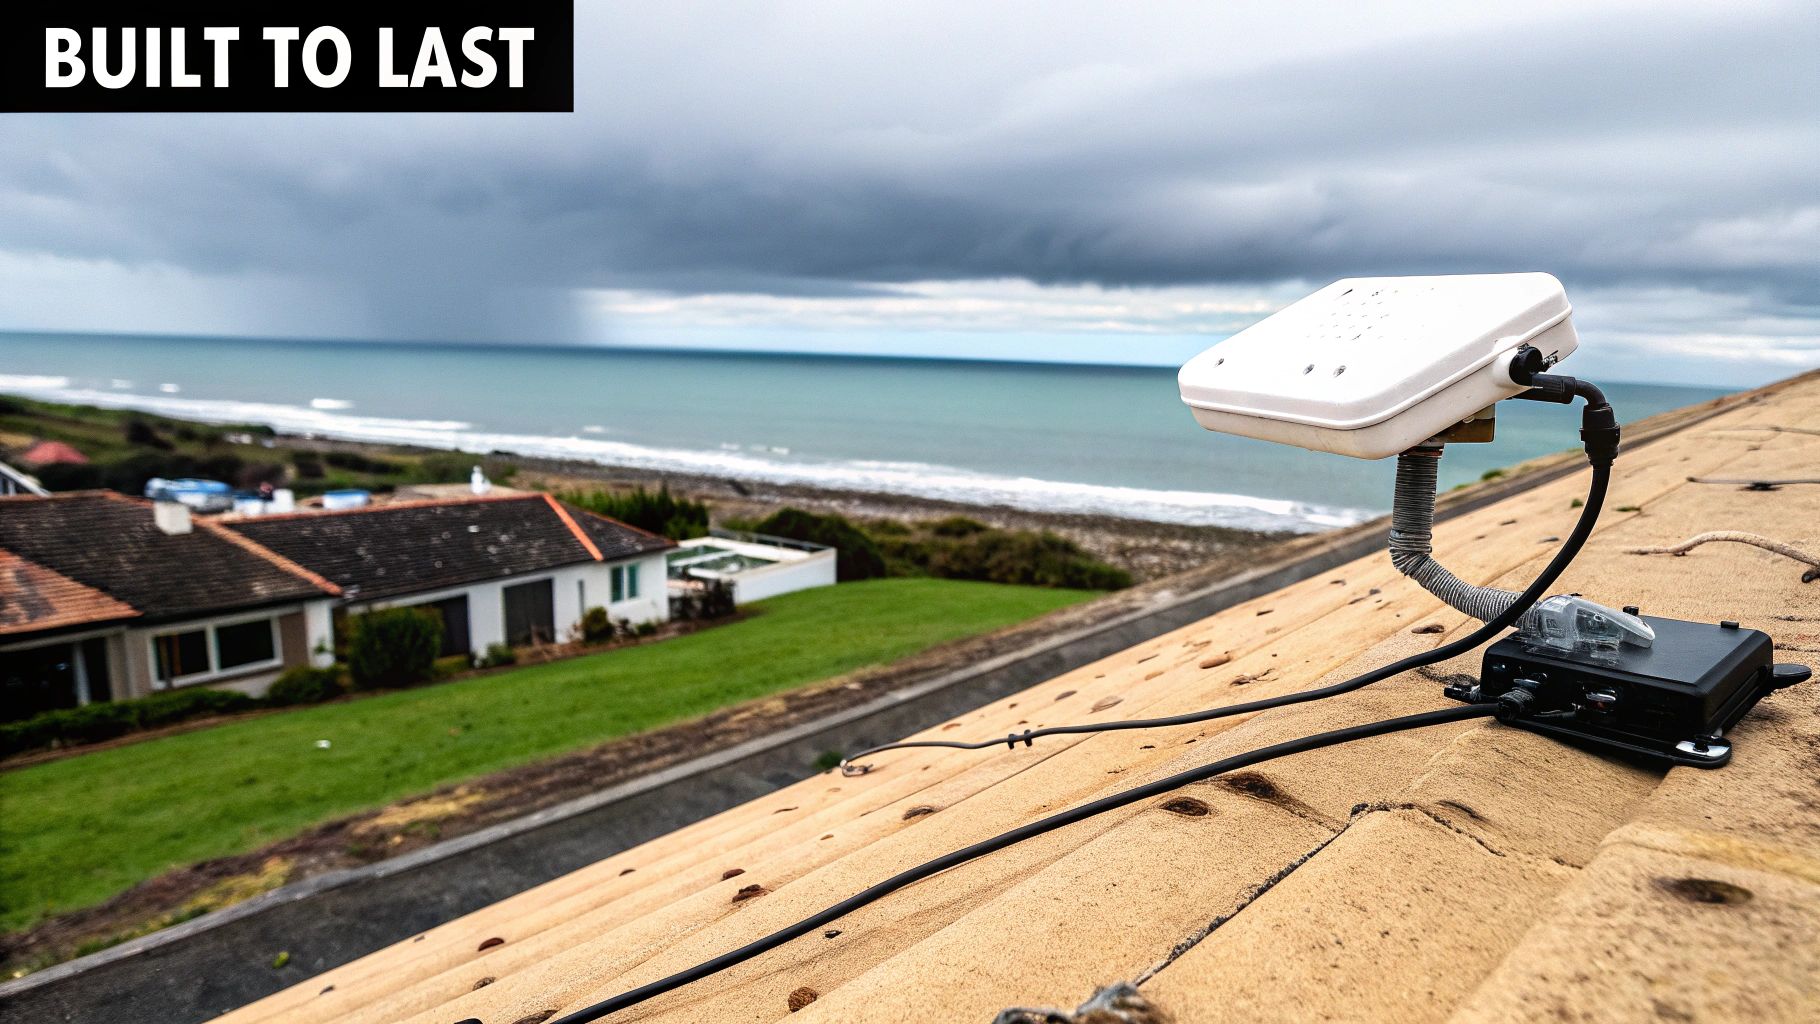
Getting your Starlink dish up and running is just the first step. The real test is making sure it can handle New Zealand's unique and often harsh weather, which is key to long-term reliability for any business. From the relentless sun in Hawke's Bay to the biting southerlies down in Otago, your mounting setup has to be tough enough for whatever comes its way.
This is about more than just keeping the dish stuck to the roof. It’s about guaranteeing the stable performance your business relies on. A mount that isn't secure can shift, leading to annoying signal drops, while poor weather protection can fry your gear right when you need it the most.
Taming High Wind Loads
Let's face it, New Zealand is a windy place. That's a simple fact you can't ignore when installing a Starlink mount. In coastal areas and up in the mountains, powerful gusts put immense strain on the mount and its fixings. The dish itself acts like a small sail, catching every bit of that wind and channelling the force directly into the mounting points.
To fight back, your installation needs to be absolutely rock solid.
- Beef Up the Hardware: Don't skimp. Always go for the strongest bolts and brackets suitable for the surface you're mounting to.
- Brace for Impact: If you're using a tall pole, make sure it’s properly guyed or braced to prevent it from whipping around in the wind.
- Find a Sheltered Spot: When possible, position the dish where it’s less exposed to the prevailing winds. Tucking it behind a part of the building can work wonders, as long as it doesn't block the signal.
The Overlooked Importance of Grounding and Earthing
Proper grounding (or earthing) is probably the most neglected, yet most critical, part of a professional Starlink install. This is especially true in regions prone to a good electrical storm. A correctly grounded system gives electrical surges from lightning or grid fluctuations a safe path to dissipate into the earth.
Skip this, and a surge can race down your cable and wipe out not just the Starlink kit, but everything connected to it—routers, switches, computers, the lot. For protecting your investment and staying online, this is non-negotiable.
A Tip from the Field: We always recommend installing a dedicated earth stake and using a quality coaxial lightning arrestor. It’s a small extra cost that can save you thousands in fried equipment and downtime. Think of it as essential insurance for any professional communication setup.
Fighting Corrosion in Marine and Industrial Areas
For any business near the coast or in a corrosive industrial zone, the choice of materials is everything. Salty air is incredibly aggressive and will eat through standard steel hardware in no time, leading to rust, weakness, and total failure.
Using marine-grade materials in these areas is an absolute must.
- 316 Stainless Steel: This is the gold standard for fasteners, brackets, and mounts in coastal environments. It’s your best defence against salt corrosion.
- Marine-Grade Aluminium: A great choice for mounting poles, offering a solid mix of strength, light weight, and corrosion resistance.
- Galvanised Steel: While not as tough as stainless, hot-dip galvanised parts can provide decent protection in less extreme coastal spots.
Getting the materials right from the start is the only way to prevent your Starlink mount from failing prematurely and to ensure the whole system stays safe and secure for years.
Smart Cable Management for a Longer Lifespan
Lastly, how you handle the Starlink cable directly affects how long your system will last. A cable left flapping in the breeze is just asking for trouble. UV rays will make the outer jacket brittle and crack, while wind, pests, or an accidental snag can easily cause damage.
Professional cable routing means securing the cable neatly with UV-resistant clips or tucking it away inside a protective conduit. It's also vital to create 'drip loops' where the cable enters a building—this simple trick stops water from following the cable inside. It’s these small details that separate a quick job from a truly durable, professional installation.
Essential Accessories and Professional Support
A professionally installed Starlink mount is the foundation of your system, but it’s the right accessories that elevate a basic setup into a seriously robust, business-grade communications tool. To truly get the most from your investment, you need gear that boosts reliability, extends your coverage, and keeps you online no matter what.
This is where specialist advice really shows its worth. While it’s tempting to just grab accessories off the shelf, sourcing them from a communications expert ensures every component is compatible, durable, and genuinely fit for purpose. It’s the difference between a system that just works and a system that works for your business.
Key Accessories for a Professional Grade Setup
For a truly resilient Starlink installation, there are a few accessories that are pretty much non-negotiable. These components tackle the common weak spots in a standard setup, making sure your connectivity is as dependable as any other critical utility.
-
Ethernet Adaptor: Starlink's Wi-Fi is good, no doubt. But for business-critical devices like servers, point-of-sale systems, or fixed desktop PCs, a hardwired connection will always be faster and more stable. An Ethernet adaptor gives you that physical, high-speed connection that isn’t at the mercy of wireless interference.
-
Mesh Wi-Fi System: A single router often just can't cut it across a large workshop, an entire farm, or a multi-level office. A mesh Wi-Fi system uses multiple nodes to blanket your entire operational area in a seamless, powerful signal, getting rid of those frustrating dead zones for good.
-
Uninterruptible Power Supply (UPS): Power fluctuations and brief outages are a fact of life in many parts of New Zealand. A UPS acts as an instant battery backup, keeping your Starlink dish and router humming along during those dips. This simple bit of kit ensures your connection—and your operations—don't miss a beat.
When you source these from a specialist provider like Mobile Systems, you’re not just buying a product. You're getting hardware that’s been field-tested and proven to work flawlessly with Starlink.
Why Professional Support is a Smart Investment
Beyond the hardware, partnering with a communications expert for the installation and ongoing support is a strategic business move. A professional installer does a lot more than just bolt the dish to your roof; they deliver a complete service that guarantees top performance and long-term reliability.
This means a proper site survey to find the absolute best spot for the dish, a precise and weatherproofed installation, and expert cable management to head off future problems. It also ensures your setup complies with any local regulations—a critical detail many people overlook.
The Specialist Advantage: A dedicated communications provider has deep knowledge of how different technologies play together. They can seamlessly integrate your Starlink system with other vital tools like the best UHF radio NZ, a Cel-Fi booster, or GPS tracking, creating a unified and powerful communications network for your whole team.
For any business that relies on being connected, this level of expertise is invaluable. It takes the guesswork out of the equation and gives you peace of mind that your system is configured for maximum efficiency and built to last. You can explore more on how a professional approach transforms a standard kit into a powerful business asset in our detailed overview of Starlink in New Zealand.
Ultimately, a professional partnership ensures your system isn't just installed—it's engineered to meet the specific demands of your business. This is your guarantee that it will be a dependable asset that supports your operations today and is ready for whatever comes next.
Common Questions About Starlink Mounts
Jumping into the world of satellite internet often brings up a few questions, especially when it comes to getting the physical setup right for a commercial operation. Here are some straightforward answers to the queries we hear most often from New Zealand businesses about installing and using Starlink mounts.
Can I Install a Starlink Mount Myself for My Business?
While you can technically install it yourself, we always recommend getting a professional in for any commercial application. There are just too many variables to risk a DIY job.
An expert guarantees the dish is placed in the absolute best spot for a completely clear signal, which is non-negotiable for business-grade reliability. They’ll also know exactly how to secure the mount to your specific building—whether it’s corrugated iron, timber, or concrete—and will properly weatherproof everything to stop leaks and prevent long-term damage.
At the end of the day, a professional installation protects your investment and makes sure the connection is solid when your business is counting on it.
What’s the Best Mount for a Vehicle or Truck?
For any moving vehicle, from a 4WD ute to a heavy-haulage truck, a purpose-built, high-quality vehicle mount is the only real option. We consistently recommend systems from specialist brands like RAM Mounts.
These aren't just generic brackets; they are properly engineered to handle the constant vibration, shocks, and movement of being on the road, all while keeping a death grip on the Starlink dish.
Key Takeaway: Steer clear of any DIY or non-specialised solutions for vehicles. They simply aren’t built for the harsh realities of the road and can easily lead to signal dropouts, damaged gear, or even a serious safety hazard if the dish works itself loose.
How Do I Deal with Obstructions Like Trees or Buildings?
Obstructions are the number one enemy of a stable Starlink connection. Even something as small as a branch waving in the dish's line of sight can cause frustrating, intermittent dropouts.
Your best bet is usually a pole mount or a long-arm wall mount. These options give you the height needed to lift the dish clean above the obstruction, giving it an uninterrupted view of the sky.
A good installer will do a proper site survey using the Starlink app and their own experience to find that perfect spot. They'll pinpoint the ideal height and location to completely eliminate any line-of-sight issues, leaving you with a flawless connection.
Do I Need Special Gear for Coastal or Marine Environments?
Yes, absolutely. This is a critical one for any installation near the coast or on a boat. In these environments, you must use marine-grade mounting hardware.
This means using components made from 316 stainless steel or a high-grade, powder-coated aluminium. These materials are specifically designed to fight off the rapid corrosion caused by salt spray, which will chew through standard steel mounts in no time and compromise the safety of your entire setup.
Always talk to a specialist for any marine or coastal jobs. They'll supply the right hardware and use the correct installation techniques to make sure your gear is safe, performs well, and lasts in New Zealand's harsh maritime environment.
Ready to secure your connection with a professional-grade solution? Mobile Systems Limited has the expertise and high-quality mounting hardware, including products from brands like RAM Mounts, Tait, and Motorola, to ensure your Starlink installation is robust, reliable, and perfectly suited to your business needs.
Explore our communication solutions and get expert advice at mobilesystems.nz
Related posts

- June 07, 2026
A single wiring error in a modern vehicle's digital bus system can lead to repair costs of up to NZ$4,500....

- June 05, 2026
Could a single corroded antenna connection result in a NZ$3 million fine? For New Zealand fleet operators working in forestry,...

- May 28, 2026
NZ police scanner frequencies are changing. Learn why & discover reliable communication solutions for NZ businesses in 2026. Authoritative guide.