Using a Two Way Radio - The Basics of Communicating
Using a Two Way Radio - The Basics of Communicating: Master PTT basics, radio etiquette, and NZ legal requirements for clear, reliable contact.
Using a two-way radio is about so much more than just pressing a button. It’s about having a clear, instant, and reliable lifeline, especially in those spots where your mobile phone gives up the ghost. This guide is all about getting you up to speed with the fundamentals—from the basic ‘Push-to-Talk’ function to the unwritten rules of good radio etiquette. We’ll make sure your messages get heard and understood, every single time.
Let's dive into the practical skills you need for effective communication right here in New Zealand.
For a great visual guide on the best way to use a two-way radio, check out this video from Icom, which we'll be discussing. Watch the Icom video here.
Your Guide to Effective Two Way Radio Communication
Welcome to your hands-on guide for mastering two way radio use in NZ.
Whether you're coordinating a team on a noisy construction site, managing a sprawling outdoor event, or just trying to stay connected deep in the backcountry, a radio is often your most dependable link.
Unlike mobile phones, which are useless without a cellular network, two way radios deliver instant, clear communication. That’s a massive advantage in many parts of Aotearoa.
Why Radio Remains a Critical Tool
Across New Zealand's key sectors—think emergency services, farming, and construction—two-way radios are still the go-to communication tool for one simple reason: RELIABILITY.
Their popularity comes down to being a cost-effective solution where one device can cover kilometres of terrain without needing a single cell tower.
That’s a game-changer in a country with our diverse and often rugged geography.
For anyone serious about their communication gear, going to a specialised provider is the way to go.
They have the expert product knowledge and stock top-tier devices from trusted brands like Motorola, Hytera, Icom, Entel or Tait, ensuring you get the right radio for the job.
To get started, it's always a good idea to brush up on the basics. Check out our guide on the best practice for radio users to learn more.
A radio isn't just a device; it's your lifeline. Mastering its use ensures your voice is heard when it matters most, whether for a routine check-in or during a critical emergency.
Beyond the specific techniques of using a two-way radio, broadening your skillset by exploring other practical skills can be incredibly valuable. This wider knowledge base can significantly improve your safety and efficiency in all sorts of professional and recreational settings across New Zealand.
Mastering the Push-To-Talk Technique
At the heart of every two way radio is the Push-To-Talk (PTT) button. It seems simple enough, but how you use it makes all the difference between a crisp, professional message and a garbled transmission that just creates confusion.
If there's one skill to get right, it's this one.
Think of it like this: a two way radio isn't a phone where you can both talk at once.
It’s a “simplex” device, meaning information only flows one way at a time.
When you press that PTT button, you're claiming the channel—your radio becomes the transmitter, and everyone else's becomes a receiver. Letting go flips it all back.
This is exactly why you'll see professional operators, like the ones in the Icom video above, follow a very deliberate sequence for every single call.
The Think, Press, Speak, Release Method
To make sure your messages land clearly every time, you need to build the "Think, Press, Pause, Speak, Pause, Release" habit. It’s a simple rhythm that cuts out the most common mistakes people make.
-
THINK: Before you even think about touching the button, know what you're going to say. Plan to keep it clear and to the point to avoid jamming up the radio networks.
-
PRESS: Firmly press the PTT button and hold it down.
-
PAUSE: This is the CRITICAL step everyone forgets. Wait a full second before you start talking. That tiny pause gives the radio time to lock onto the channel, so the beginning of your message doesn't get chopped off.
-
SPEAK: Hold the microphone about 5-10 centimetres from your mouth. Use a clear, normal voice. There's absolutely no need to shout—yelling just distorts your audio, making you harder to understand, not easier.
-
PAUSE: Once you’ve finished speaking, hold the button for another brief moment. This makes sure the last word of your transmission gets through cleanly instead of being cut short.
-
RELEASE: Now you can let go of the PTT button, freeing up the channel for a response.
This visual guide is a great reminder of the basic steps.
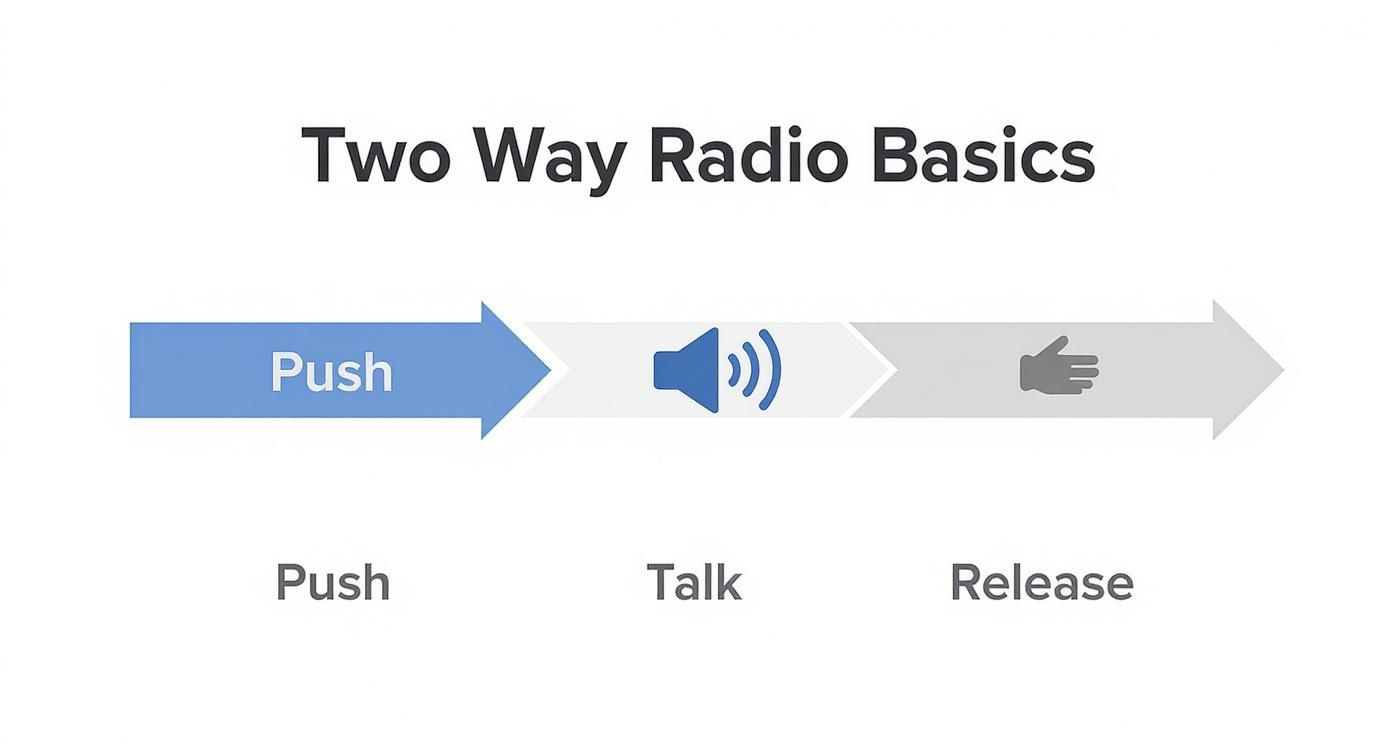
It really shows how proper communication is a deliberate process, not just a single action.
Why This Technique Actually Matters
For any team that depends on radios for health and safety, getting this right isn't just a "nice-to-have"—it's NON-NEGOTIABLE.
Think about a crane operator guiding a critical lift or a forestry worker reporting an incident on a remote site. Every single word has to be heard perfectly.
Mastering the PTT pause is the single most effective way to improve your radio clarity. It prevents clipped transmissions and ensures the start of your message—often the most critical part—is always heard.
When you consistently use this method, you create a rhythm of professional, reliable communication.
Your team will understand you better, the whole operation will run smoother, and everyone stays safer. It’s the foundational skill for anyone picking up a handheld or vehicle-mounted radio.
Navigating Channels and Radio Etiquette
Getting your message across is about more than just hitting the Push-to-Talk button.
To communicate effectively, you need to be on the right channel and follow a few simple rules of the road to keep the airwaves clear for everyone.
Think of it like picking the right lane on the motorway—it stops you from crashing into other people's conversations and keeps your own team connected.

Here in New Zealand, you'll generally come across two main types of channels.
The first are the public UHF CB (Citizen Band) channels, which are open for anyone to use under the General User Radio Licence. These are perfect for recreational use, like 4WD adventures or coordinating a small event.
The second type, which most businesses rely on, are private, licensed radio networks. These are secure channels allocated exclusively to your company.
This guarantees your sensitive operational chat stays private, without the interference and random chatter you often get on public frequencies.
The Unwritten Rules of the Airwaves
No matter what channel you're on, good radio etiquette is non-negotiable.
It’s the key to efficient, professional communication and is absolutely vital for both health and safety and operational success.
The golden rule is simple: listen before you talk.
Always pause for a moment to make sure the channel is clear before you start speaking. Jumping in and talking over someone else, especially during a critical instruction, can cause serious problems on site.
Keep your messages clear and to the point. Radio channels are a shared space, so this isn't the time for a long-winded story. Get your message out, then let go of the PTT button so others can reply or make their own calls.
A clear channel is a safe channel. The discipline to listen first and speak concisely ensures that critical information can always get through without delay, which is the cornerstone of effective team communication.
Standard Calling Procedures
Using a standard calling procedure makes every exchange more efficient because it instantly clarifies who is talking and who the message is for.
The format is straightforward: state who you're calling, then say who you are.
- For example: "Site Office, this is Crane Operator One, over."
This immediately tells the Site Office to pay attention and lets them know who's on the other end. In New Zealand’s commercial world, that clarity is essential.
A few standard pro-words also help to manage the flow of conversation. These are just short, standard phrases with a clear meaning.
- Over: I've finished talking and I'm waiting for you to reply.
- Out: I've finished talking and I'm not expecting a reply. The conversation is over.
- Roger: I heard and understood your last message.
These words are the basic building blocks of professional radio comms. If you want to get a better handle on the lingo, our guide on procedure words in radio communications is a great place to start. Nailing these will make you sound like a pro and make your communications far more effective.
Understanding Legal Use and Licensing in New Zealand
Using a two way radio in New Zealand isn't a complete free-for-all.
It's crucial to get your head around the rules to make sure you're communicating legally and not treading on anyone else's toes.
Getting this right stops you from interfering with other users—especially critical services—and keeps your team's comms clear and private.
The good news is that for most Kiwis, using a radio is pretty straightforward. Many recreational users and small businesses are covered by something called the General User Radio Licence (GURL).
This licence, which is managed by Radio Spectrum Management (RSM), lets anyone in New Zealand use certain frequencies without having to apply for a personal licence.
The General User Radio Licence (GURL)
The GURL covers a few specific bands, but the ones you'll run into most often are the UHF CB (Citizen Band) and PRS (Personal Radio Service) frequencies.
These are the channels pre-programmed into most standard walkie-talkies you'd buy for general use.
They're perfect for things like:
- Keeping a convoy coordinated on a 4WD trip.
- Staying in touch with the family during outdoor adventures like hiking or boating.
- Managing staff at small events or out on the farm.
While these channels are incredibly handy, there is a catch: they are completely public. Anyone with a compatible radio can listen in or jump on the channel, which can lead to a lot of chatter, interference, and ZERO PRIVACY.
When You Need a Dedicated Licence
For most businesses, from construction sites to transport fleets, the open-slather nature of GURL channels just doesn't cut it for professional work.
This is where getting your own dedicated, private licensed channels becomes a NECESSITY.
Getting a private licence from RSM gives your organisation exclusive use of one or more frequencies within a specific area. The advantage here is massive.
Secure communication is a cornerstone of professional operations. A dedicated licensed channel ensures your sensitive logistical details and critical health and safety messages remain private and free from the interference that plagues public bands.
The application process with RSM can feel a bit daunting.
That’s why working with a specialised supplier is the smart move. Experts in radio networks can handle the entire licensing headache for you, from figuring out the best frequencies for your area of operation to managing all the paperwork.
It’s the easiest way to make sure your comms system is both effective and fully compliant.
To give you a clearer picture, here’s a quick rundown of some common radio bands you’ll find in New Zealand and who typically uses them.
Common NZ Radio Bands and Their Uses
| Radio Band | Primary Users | Licensing Requirement |
|---|---|---|
| UHF CB/PRS | Public, small businesses, 4WD clubs, farming, events. | GURL – No personal licence needed. |
| VHF/UHF Land Mobile | Commercial fleets, construction, security, transport. | Dedicated private licence required. |
| Marine VHF | Boats, Coastguard, marine operations. | Restricted Radiotelephone Operator's Certificate (RROC) needed. |
| Aviation VHF | Aircraft, air traffic control, ground crews. | Flight Radio Telephony Operator (FRTO) rating required. |
As you can see, different bands have very different rules.
It is absolutely critical to understand that certain frequencies, like Marine VHF and the aviation bands, are strictly off-limits. You must NEVER transmit on these channels unless you are properly authorised or it is a genuine life-threatening emergency.
Knowing your way around these regulations is a non-negotiable part of being a responsible radio user. To dive deeper into this topic, check out our guide on the fundamentals of radio communication basics.
Keeping Your Radio Ready for Action
Your two-way radio is a lifeline, not just another piece of kit.
Like any critical tool, it needs a bit of regular care to make sure it performs flawlessly when you need it most.
Getting into good maintenance habits is straightforward, but it can make all the difference between a reliable device and one that lets you down at the worst possible moment.
This is especially true for our emergency services here in New Zealand, who rely on their radios for coordinating operations during natural disasters.
When the 2011 Christchurch earthquake struck, two-way radios became the vital communication link for Civil Defence, police, and medical teams after the mobile networks collapsed. Their proven reliability is exactly why they're so essential.
You can find out more about the resilience of these networks during crises.
Maximising Your Battery Life
The battery is the heart of your portable radio.
A little TLC will extend its lifespan and guarantee it has the power to get you through a long shift or an unexpected call-out. Modern lithium batteries are workhorses, but they still benefit from a smart charging routine.
- Use the Right Charger: Stick with the manufacturer-approved battery charger for your specific model, whether it’s for an Icom, Motorola, or Entel radio. Using a mismatched charger is a fast way to damage the battery.
- Avoid Overcharging: Once the battery is fully charged, take it off the charger. Leaving it on indefinitely can slowly degrade the battery cells.
- Condition New Batteries: For the first couple of cycles, let a new battery charge fully and then run it down completely before recharging. This simple step helps it reach its maximum capacity.
Simple Physical Checks and Maintenance
Keeping your radio physically clean and intact is just as important as battery care.
Dust, moisture, and general grime can work their way into sensitive components and mess with performance.
A blocked microphone grille is a classic cause of muffled or quiet transmissions. Just give it a gentle clean with a soft, dry brush to clear out any built-up gunk. This tiny action can make a huge difference to your audio clarity.
Your antenna is your radio's link to the outside world, so look after it.
A damaged antenna is the number one cause of poor range. Regularly check that it is screwed on securely and give it a quick once-over for any cracks, bends, or other visible damage. Never, ever operate the radio without an antenna attached—you risk frying the transmitter.
Basic Troubleshooting Tips
If you run into issues, a few quick checks can often sort the problem out without needing to call in a technician.
- Poor Audio Quality: First, check the battery level and make sure the antenna is secure. Don't forget to clean the microphone grille. Also, if you're standing too close to another radio, you can get feedback, so take a step back.
- Won't Turn On: Nine times out of ten, it’s a dead or improperly seated battery. Try a fully charged spare battery to see if that solves it.
- Poor Range: This is almost always an antenna issue. Check for damage and ensure it's screwed on tight. Also, think about your location—hills, big buildings, and dense bush can all block your signal.
A well-maintained radio, whether it's a rugged handheld for the worksite or an IP67-rated waterproof model for the boat, is a dependable one. These simple habits will ensure your comms are always ready for the job.
Got Questions About Your Two Way Radio? We've Got Answers
Even after you've got the hang of the basics, a few questions always pop up when you're getting serious about using a two way radio.
We get these all the time from users across New Zealand, so we’ve put together some straightforward answers to help you get communicating with confidence.
What Is the Typical Range of a Handheld Two Way Radio?
This is the classic "it depends" question.
The real-world range of a handheld radio hinges on a few key things: the terrain you're in, any physical obstacles, and your radio's power output.
If you're out in the open on flat land, you might get several kilometres of crystal-clear chat.
But the moment you head into a city full of tall buildings or into dense Kiwi bush, that range can plummet to a kilometre or even less.
A good rule of thumb? A vehicle-mounted unit with a proper external antenna will always outperform a small handheld.
Can I Use My NZ UHF Radio in Australia?
You sure can.
The UHF CB channels we use here in New Zealand are the same as those in Australia, so your walkie talkie will work perfectly fine across the ditch.
That said, it’s always smart to have a quick check of the local rules for any restricted channels in the specific area you’ll be visiting. Better to be safe than sorry.
Your radio's performance is directly tied to its environment. Always consider the landscape between you and the person you're trying to reach—what you see is what your radio signal has to get through.
Do I Need a Licence to Use a Walkie Talkie?
For most everyday use on the standard UHF CB or PRS channels—think hiking, small worksites, or family trips—you're all good.
You're covered by New Zealand’s General User Radio Licence (GURL), which means no personal paperwork is needed to get on the air.
However, if you're a business that needs secure, private, and interference-free communication, a dedicated licence from Radio Spectrum Management (RSM) is a must.
This gets you exclusive access to your own private radio frequencies, so you’re not competing with everyone else.
Why Does My Radio Sound Garbled or Staticky?
Dodgy audio is a pain, but it's usually down to one of a few simple culprits. Before you panic, run through this quick checklist:
- Low Battery: This is the number one cause. A weak battery just doesn't have the juice to transmit cleanly. Make sure it's fully charged.
- Loose Antenna: Give your antenna a wiggle. It should be screwed on firmly to the radio.
- Blocked Microphone: Check the little mic grille for dust or dirt. A quick clean can work wonders.
- Out of Range: You might just be pushing the limits of your radio's signal. Try getting closer or to a higher point.
- Interference: Other radios, power lines, or even large electronic devices can cause that annoying static.
Running through these basics will solve the problem nine times out of ten.
Getting your head around two-way radio communication can feel a bit overwhelming, but you don't have to figure it all out on your own. For expert advice, professional gear, and help with licensing here in New Zealand, you can trust the specialists at Mobile Systems. We’re here to keep you connected when it counts.
Find your perfect communication solution at https://mobilesystems.nz
Related posts

- June 16, 2026
Mobile Systems Limited's 2026 buyer's guide to satellite phones covers Iridium vs Inmarsat vs Starlink Direct to Cell, dedicated handsets,...

- June 15, 2026
Mobile Systems Limited's 2026 guide for NZ businesses covers VHF vs UHF frequency selection, Digital Mobile Radio, IP67 durability ratings,...

- June 14, 2026
A portable PA system is a critical safety and communication tool, not just a luxury for public events. When you're...