A Wifi Speed Test NZ Businesses Can Actually Trust
Is your connection holding you back? Learn how to perform a WiFi speed test NZ businesses can rely on to diagnose issues and boost network performance.
Running a quick speed test might feel like you're getting a handle on your network, but for a New Zealand business in transport, construction, or maritime, a generic result can be dangerously misleading. A proper wifi speed test in NZ isn’t just about seeing if you can stream video; it’s the first, crucial step in diagnosing whether your mission-critical systems will hold up when you need them most.
Why Generic Speed Tests Fail NZ Businesses

For commercial operations right across New Zealand, connectivity isn't a nice-to-have—it's the backbone of your safety, efficiency, and productivity.
The standard speed tests, designed for checking your home broadband, typically measure simple throughput under ideal conditions.
They completely miss the reality of a busy commercial site where multiple systems are all fighting for bandwidth.
This isn't about whether a staff member can watch a video during their lunch break.
It's about whether your essential cloud-based safety software, VoIP communications, or vehicle tracking systems are going to collapse under pressure.
A misleadingly "good" speed test can create a false sense of security, leaving your entire operation vulnerable.
The Metrics That Truly Matter
That single download number you see? It tells you very little on its own.
To really understand what your network is capable of, you need to look at four key metrics together. Each one reveals a different piece of the performance puzzle.
- Download Speed (Mbps): This is the one everyone knows—how quickly data gets pulled from the internet to your device. It’s important for accessing cloud files, loading job specs, or streaming CCTV feeds.
- Upload Speed (Mbps): Often overlooked, but for businesses, this is absolutely CRITICAL. It dictates how fast you can send large reports, upload site photos, back up data, and participate in stable video calls.
- Ping (Latency, in ms): Think of ping as your connection's reaction time—how long it takes for a signal to travel to a server and back. High ping creates frustrating delays in real-time applications like two-way radio over IP or VoIP calls.
- Jitter (ms): Jitter measures the variation in your ping. A high jitter number means your connection is unstable and unpredictable, causing distorted audio on calls and lag spikes that can disconnect critical systems without warning.
For a transport company, high latency could mean a serious delay in GPS tracking updates. For a construction site manager relying on cloud-based plans, poor upload speed could mean minutes wasted trying to send a single high-resolution image back to the office.
A business-grade network isn't defined by its maximum download speed. It's defined by its consistent ability to deliver low latency, minimal jitter, and sufficient upload capacity for all simultaneous business operations—something a generic test simply can't measure.
The New Zealand Commercial Context
The unique operational challenges here in New Zealand demand a much more thorough approach.
A freight depot in Tauranga, a construction site in rural Waikato, or a marine vessel off the Coromandel coast all face completely different connectivity hurdles.
Generic tools just don't account for real-world factors like:
- Signal Obstructions: Concrete walls, metal shelving, and heavy machinery can absolutely decimate a Wi-Fi signal.
- RF Interference: On-site equipment, from microwaves to powerful two-way radios like those from Tait or Hytera, can clash with your Wi-Fi frequencies.
- Device Congestion: Multiple scanners, tablets, and computers all trying to connect at once can bring a consumer-grade network to its knees.
Understanding these factors is the difference between a network that works on paper and one that performs reliably in the field.
This guide will show you how to move beyond a simple number and conduct a meaningful wifi speed test NZ businesses can depend on, with expert guidance from specialists who understand these commercial realities.
How to Prepare for an Accurate Speed Test
To get a true picture of your network's performance, you can't just run a random wifi speed test nz and hope for the best.
If you want data you can actually rely on, you first have to create a controlled environment.
This just means systematically removing all the common variables that can mess with your results and give you a false reading.
Think of it like a science experiment, the fewer things left to chance, the more accurate the outcome.
Your goal is to measure the raw potential of your internet connection, not the combined performance of your connection plus all the background noise happening on your network.
A few simple prep steps are non-negotiable if you want a meaningful test.
Isolate Your Testing Device
First things first: the device you're testing from needs to be the only thing actively using your network.
Any other activity, no matter how small it seems, will chew up bandwidth and drag your results down.
Before you start, make sure you:
- Disconnect other devices: Temporarily kick all other computers, tablets, security cameras from brands like Viewtech or Dahua, smart TVs, and phones off the Wi-Fi.
- Pause all downloads and updates: Check for any active file downloads, software updates, or cloud syncing (like Dropbox or Google Drive) and hit pause.
- Close unnecessary applications: Shut down all non-essential programs and browser tabs on your test machine. Things like email clients, team chat, and even music streaming apps can use a surprising amount of bandwidth in the background.
This isolation gives the speed test exclusive access to your internet connection, giving you a clean baseline measurement of its maximum capability. Without this, you're just measuring a diluted result.
Use a Wired Connection First
One of the most common mistakes people make is confusing a poor Wi-Fi signal with a poor internet connection.
They are two completely different problems.
The best way to figure out which one you have is to bypass the Wi-Fi entirely for your first test.
Whenever you can, plug your computer directly into your router with an Ethernet cable.
This hardwired connection cuts out all the variables that come with wireless performance, like signal interference, distance from the router, and physical walls getting in the way.
A direct Ethernet test tells you the true speed being delivered to your property. If this result is slow, the problem is likely with your internet provider. If the Ethernet test is fast but your Wi-Fi tests are slow, the problem is somewhere inside your building.
Understanding this difference is the most important part of troubleshooting. For a deeper dive into the technical side of things, you can learn more about the fundamentals of broadband, Ethernet, and Wi-Fi connections in our detailed guide. This knowledge will help you pinpoint exactly where the performance bottleneck is.
Choose a Reliable Testing Tool
Not all speed test websites are created equal. Many are cluttered with ads that can slow things down, and some use servers located far from New Zealand, which can artificially inflate your latency (ping) and give you wonky readings.
For a reliable wifi speed test in NZ, stick to reputable, clean platforms known for their accuracy. Tools like Ookla's Speedtest or Cloudflare's speed test are excellent choices because they maintain a strong network of local servers across New Zealand.
Using a tool that connects to a server in Auckland, Wellington, or Christchurch will give you a much more realistic measurement of the performance you can expect day-to-day.
Performing a Comprehensive On-Site Wifi Analysis
A single, isolated speed test gives you a snapshot.
A comprehensive on-site analysis gives you the full picture.
If you really want to understand your network's real-world performance, you need to move beyond one-off tests and get a bit more strategic.
This approach transforms a simple wifi speed test nz from a quick check into a powerful site survey tool, mapping out your connectivity strengths and weaknesses with precision.
First things first: establish a clear baseline.
By running an Ethernet-cabled test right next to your router, you confirm the maximum speed your provider is actually delivering to the building.
Every wireless test you do after this should be compared against that number.
Mapping Your Critical Operational Zones
Once your baseline is set, it's time to map your Wi-Fi performance where it really matters.
Your goal is to methodically test every area that's critical to your business operations.
Don't just test from your desk—get out and walk the floor.
Think about your daily workflow and identify the key zones:
- The main workshop floor, especially around machinery and metal racking.
- The dispatch office, where multiple devices are constantly connected.
- The far corner of the storage yard, where signal strength is likely to be weakest.
- Even inside the cab of a truck or piece of heavy machinery to simulate real-world usage.
Testing in these specific locations helps you build a performance map that reflects the reality of your operations.
You might find the connection in the office is perfect, but it drops off dramatically just ten metres away on the workshop floor—an insight you'd never get from a single test.
This process flow shows the basic prep for each test you run.
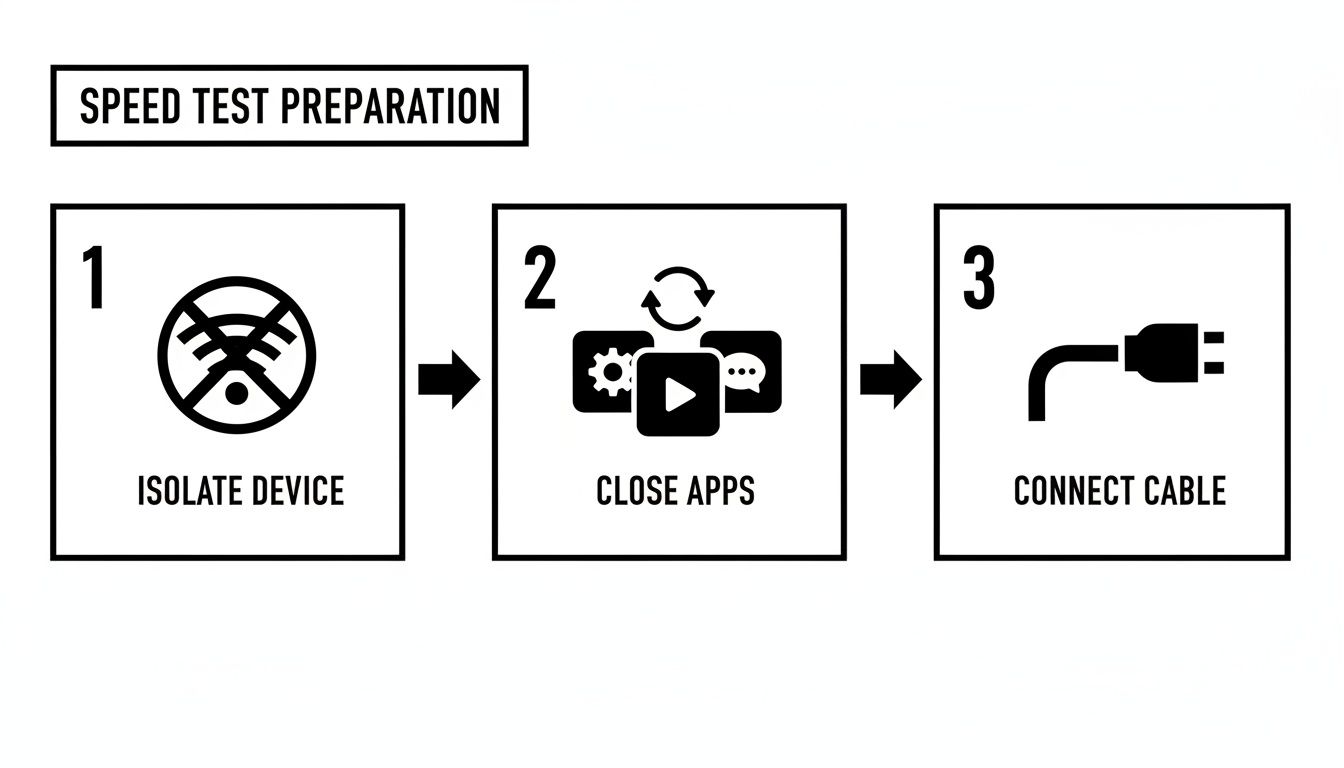
It’s a simple but crucial discipline. Isolating the device, closing background apps, and using a wired connection for your baseline ensures every bit of data you collect is as clean as possible.
The Importance of Timing and Repetition
A network's performance can change drastically throughout the day.
A test run at 7 am before most staff arrive will produce a very different result from one at 2 pm when your operation is at its peak.
This is why testing at different times is non-negotiable for a proper site analysis.
Run tests during both your quietest and busiest hours.
This helps uncover congestion problems that only appear when the network is under stress.
You might find, for example, that your VoIP calls get choppy every afternoon. Timed tests could reveal a massive drop in upload speed and a spike in jitter right when your cloud backup system kicks in.
Don’t rely on a single measurement from any location. Run at least three tests in each critical zone and at each time interval, then average the results. This simple step helps smooth out any random fluctuations and gives you a much more reliable data point.
Recording the Right Data
As you move through your site analysis, it's vital to meticulously record the data from every single test.
A simple spreadsheet is perfect for this.
For each test, you should log:
- Location: Be specific (e.g., "Back of workshop, by the lathe").
- Time of Day: Note the exact time.
- Download Speed (Mbps): The core download figure.
- Upload Speed (Mbps): Often the more critical number for business.
- Ping (ms): Your connection's response time.
- Jitter (ms): The stability of that connection.
By building this detailed performance map, you're no longer guessing. You have concrete evidence that pinpoints exactly where and when your Wi-Fi is failing to meet your needs.
Beyond just the speed test, a full analysis requires a deeper look into network activity. Understanding and utilizing network usage monitoring tools can help identify bandwidth-hogging applications or unexpected data transfers that are dragging things down.
This data-driven approach is the foundation for making informed decisions about equipment upgrades, from better access points to robust signal boosters like a Cel-fi unit.
Making Sense of Your Wi-Fi Speed Test Results in NZ
You've run the tests, and now you’re staring at a spreadsheet full of numbers.
So, what does it all actually mean?
A Wi-Fi speed test in NZ gives you data, but that data is only useful once you put it in the right context.
A download speed that’s brilliant in a rural area might be a huge red flag in an urban centre.
This is the crucial next step: interpreting your findings against realistic local benchmarks.
It’s how you figure out if performance issues are coming from your internal Wi-Fi setup, a problem with your internet provider, or the simple limitations of the infrastructure in your region.
First, Know Your Connection Type
New Zealand businesses have a few different ways of getting online, and each one comes with its own set of performance expectations.
Knowing where your service sits is the first step to judging your results fairly.
- Fibre: This is the gold standard, giving you the fastest speeds and lowest latency. If you have fibre and your results are poor, the problem is almost certainly somewhere on your premises.
- VDSL: Think of this as a faster version of the old-school copper broadband. Performance can be a bit of a mixed bag, depending heavily on how far your building is from the local cabinet.
- 4G/5G Fixed Wireless: This uses the cellular network to deliver your internet. Speeds can be excellent, but they are more prone to issues like network congestion and signal strength.
- Satellite Internet: For really remote operations, solutions like Starlink offer a lifeline where nothing else can reach. Performance is getting better all the time but can be affected by weather and a clear view of the sky.
Comparing your results to what’s typical for your connection type is the only way to know if you're actually getting the service you’re paying for.
Typical NZ Broadband Speeds By Connection Type
Here's a general guide to the average download and upload speeds businesses can expect from various internet connection technologies across New Zealand.
Use this table as a reference point. Compare your own test results to see how you stack up against the average for your connection type.
| Connection Type | Typical Download Speed (Mbps) | Typical Upload Speed (Mbps) | Best For |
|---|---|---|---|
| Fibre (Hyperfibre) | 2000 - 8000+ | 2000 - 8000+ | Data-heavy industries, large offices, mission-critical cloud operations. |
| Fibre (Standard) | 100 - 900 | 100 - 500 | Most businesses, supporting reliable VoIP, CCTV, and cloud software. |
| VDSL | 30 - 70 | 10 - 20 | Smaller offices or sites where fibre is not yet available. |
| 4G/5G Fixed Wireless | 50 - 300+ | 20 - 80 | Good for urban and rural sites with strong cell coverage. |
| Starlink Satellite | 100 - 250 | 10 - 25 | Remote worksites, farms, and maritime vessels outside other coverage. |
If your baseline Ethernet test result falls way short of these figures, it’s a strong sign that the problem lies with your Internet Service Provider (ISP) or the main connection into your building.
The Reality of Regional Differences
Let's be honest: internet performance is not the same everywhere in New Zealand.
Where your business is located has a massive impact on the speeds you can realistically expect.
This is incredibly important for mobile workforces who rely on stable connections for live asset tracking, VoIP calls, and cloud-based safety tools.
Recent data really brings these regional differences into sharp focus. According to Ookla’s New Zealand Speedtest Connectivity Report for H1 2025, the Wellington Region clocked the fastest median fixed download speed at 216.4 Mbps. Meanwhile, the West Coast was sitting at just 77.11 Mbps—barely 36% of Wellington’s performance. Auckland and Canterbury were next behind Wellington with speeds around 190–200 Mbps, while Gisborne and Northland trailed below 100 Mbps.
The same pattern holds true for mobile. Wellington led the pack with a median download of 123.45 Mbps, while Northland managed only 50.38 Mbps. You can dig deeper into these numbers in the full connectivity report from Ookla.
What does this all mean for you? It means you have to benchmark your results against your specific region. A "slow" connection in Wellington could be an exceptionally fast one on the West Coast. This context is essential before you start throwing money at new hardware.
By comparing your test data to both your connection type and your regional benchmarks, you can finally get to the root cause of your connectivity problems.
This data-driven approach tells you whether you need to optimise your on-site Wi-Fi, have a firm chat with your ISP, or accept local limitations and look at specialised solutions like signal boosters from Cel-Fi or dedicated satellite services.
Common Causes of Poor Wifi and How to Fix Them
So, you’ve run a thorough wifi speed test nz businesses can rely on, and now you have a clear map of your network's performance.
You know precisely where the connection drops off and when it struggles.
The next logical step is to dig into why it's happening and, more importantly, what you can do about it.
In demanding commercial and field environments, the culprits behind poor Wi-Fi are rarely simple. It's often a messy combination of physical barriers, signal interference, and hardware that just isn't up to the job.
Here's a practical troubleshooting guide to help you tackle the most common issues we see on site.
Physical Obstructions and Signal Killers
One of the biggest enemies of a stable Wi-Fi signal is the very structure of your workplace.
Unlike a typical home or office, commercial sites are full of materials that absorb, block, or reflect wireless signals.
Common physical barriers we run into include:
- Concrete and Masonry: Thick concrete walls and floors are notorious for soaking up Wi-Fi signals, creating frustrating dead zones.
- Metal Shelving and Racking: In warehouses and workshops, these large metal structures act like mirrors, causing signals to bounce erratically and become unreliable.
- Machinery and Vehicles: Even a parked truck or a large piece of equipment can create a significant signal shadow, completely blocking connectivity behind it.
The most immediate fix is to optimise the placement of your router or access points.
You want them positioned centrally, as high as possible, and away from dense physical barriers to give the signal the clearest path.
Once your speed tests have highlighted problem areas, this helpful guide on how to improve WiFi signal offers some great practical steps.
Signal Interference From Other Devices
Your Wi-Fi network doesn't operate in a bubble. It has to share the airwaves with countless other electronic devices, many of which can cause serious interference and drag down performance.
This is especially true on the crowded 2.4 GHz frequency band.
Sources of interference can be anything from microwave ovens and cordless phones to industrial equipment like motors and even other nearby wireless networks.
Even robust two-way radios from brands like Motorola or Uniden can contribute to a noisy radio frequency (RF) environment, making it harder for your Wi-Fi to be heard.
A good first step is to switch as many of your devices as you can over to the 5 GHz Wi-Fi band, which is usually much less congested.
Upgrading to modern, business-grade access points also makes a big difference, as they have far better technology for navigating and mitigating interference.
Limitations of Consumer-Grade Hardware
We see this all the time: businesses trying to get by with routers and access points designed for home use.
While they're affordable, this sort of hardware simply isn't built to handle the demands of a commercial setting.
A standard home router might be fine for a few laptops and phones, but it will quickly get overwhelmed by dozens of connections from staff tablets, VoIP phones, security cameras, and inventory scanners all hitting it at once.
The result? Dropped connections, slow speeds, and high latency for everyone.
It's crucial to remember that a strong internet plan means little if your internal Wi-Fi is the bottleneck. The connection to your premises might be perfectly fine, but consumer hardware can prevent that speed from ever reaching your devices.
Independent monitoring shows that New Zealand Wi-Fi and broadband plans often deliver close to, or even above, their advertised speeds under ideal conditions.
The Commerce Commission’s Measuring Broadband New Zealand (MBNZ) programme reports that top-end ‘Fibre Max’ lines test at about 880 Mbps download and 500 Mbps upload.
If your wired tests show speeds like this but your wireless performance is terrible, your hardware is the most likely culprit.
For larger or more complex sites, the solution is almost always an upgrade to a system of business-grade access points or a mesh Wi-Fi network to provide seamless coverage.
And for overcoming weak cellular signal—a common issue in metal-clad buildings—a professional signal booster is often the best strategy. You can find more on how these work in our guide to choosing a Wi-Fi booster in NZ.
These steps ensure the great internet speed you're paying for actually makes it to the devices that need it.
When to Partner with a Connectivity Specialist
Let's be honest, DIY troubleshooting has its limits.
After running a detailed wifi speed test nz businesses can trust, you might realise the issues run deeper than just moving a router or changing a Wi-Fi channel.
There comes a point where guessing is no longer a viable strategy, and you need to bring in a specialist communications provider.
Knowing when to make that call is half the battle.
If you're wrestling with persistent dead zones, connections that buckle under pressure, or performance drops that basic fixes just won't touch, it's time to stop the guesswork.
For some situations, professional help isn't just a good idea—it's essential.
Complex Environments and Integrated Systems
Designing reliable connectivity for large or difficult sites is a different beast entirely.
Think about places like packhouses, busy ports, or sprawling construction sites—they’re filled with unique obstacles that off-the-shelf equipment simply can't handle.
Trying to overcome challenging terrain or get multiple communication systems to play nice requires specialist expertise.
This is where a professional site survey becomes invaluable. A genuine specialist won’t just look at your Wi-Fi; they’ll design a holistic solution that can integrate:
- Robust, high-capacity Wi-Fi networks built for your specific demands.
- Dependable two-way radio communications from proven brands like Tait or Hytera.
- Cellular signal boosters, like Cel-Fi units, to punch through metal-clad walls and guarantee coverage indoors.
Trying to patch these systems together on your own often ends in frustration, with interference issues, poor performance, and a lot of wasted money.
Overcoming New Zealand's Connectivity Realities
While New Zealand’s internet infrastructure is strong on paper, national averages don't tell the whole story.
As of late 2025, Ookla’s Speedtest Global Index ranks New Zealand 33rd in the world for mobile speeds and 28th for fixed broadband.
That’s pretty solid, but it hides the huge variations between different regions and technologies. You can explore the full Speedtest Global Index for New Zealand to see the data for yourself.
A median fixed download speed of around 210–220 Mbps is great for someone in Auckland, but it means very little to a fleet manager on the West Coast or a marine operator in a remote bay.
When your business operates beyond the reach of standard fibre or 4G, or if your site has unique structural challenges, a standard ISP can’t help. You need a partner who understands how to deploy specialised hardware to guarantee performance.
This is where more advanced solutions make all the difference.
For truly remote sites, options like Starlink are delivering high-speed connectivity where it was once impossible. We dig into how this technology is changing the game for rural businesses in our guide to Starlink in New Zealand.
From the initial site survey right through to installing rugged, reliable hardware, a specialist partner provides a complete solution designed specifically for your operational needs.
When that simple speed test uncovers a mission-critical challenge, it’s a clear sign it’s time to call in the experts.
When your business can't afford to guess with its connectivity, Mobile Systems Limited delivers proven, professional solutions. For expert advice and a professional site survey, contact our team today. Find out more at https://mobilesystems.nz.
Related posts

- July 23, 2026
Treat comms as safety equipment, not an accessory. Here's how terrain mapping, repeater planning and designing for failure actually hold...

- July 23, 2026
Signal isn't something to hope for out on a remote site, it's something to plan around. Here's when a walkie-talkie...

- July 19, 2026
Torch or streetlights? We break down real walkie-talkie and PoC radio coverage, current RSM costs, and when blending both is...