Understanding the Essentials of a 4x4 UHF Radio Setup
A 4x4 UHF radio setup is a line-of-sight communication system running on the 477 MHz band. Unlike your phone, which needs a cell tower, UHF lets vehicles talk directly to each other with no infrastructure in between. It's built on the UHF CB standard, shared between Australia and New Zealand, which is exactly why it's the default tool for off-roaders, farmers and tourers alike.
A working setup has three parts: a vehicle-mounted transceiver, a decent antenna, and a clean 12V power supply. Every one of those needs to handle the vibration of off-road driving, or it'll fail when you least expect it. A solid vehicle-mounted two-way radio built for this kind of use takes care of the durability side of that equation.
If you want to see what a real install looks like rather than just reading about it, this is a straightforward GME XRS Connect install in a New Zealand-built 4WD:
UHF vs VHF: Why 4x4s Use UHF
UHF waves are shorter than VHF, which means they bounce around obstacles and push through vegetation more easily. In thick bush, that's exactly what keeps your convoy in contact. VHF travels further over open water or flat plains, but it gets blocked hard by hilly terrain, which describes most of the country you'll actually be driving in.
UHF antennas are also smaller, which matters when you're mounting on a bull bar or roof rack under low branches. VHF might win on raw distance in the right conditions, but for short-to-medium range convoy work on technical tracks, UHF is the better tool for the job.
The Personal Radio Service in New Zealand
New Zealand's Personal Radio Service (PRS) gives you 80 channels to use, completely free, under what's called a General User Radio Licence (GURL). There's no application, no fee, and no paperwork. You just need equipment that's approved for use here, carrying the R-NZ compliance mark.
The legal power limit for PRS equipment is 5 Watts. That's not a suggestion, it's the law, and running modified or unapproved high-power gear is illegal here. It can also interfere with services that genuinely need clear airwaves, including emergency responders.
Selecting Hardware: Matching Antennas and Radios to NZ Terrain
Picking gear for a 4x4 UHF radio setup isn't about finding the unit with the most buttons. It's about matching hardware to the landscape you'll actually be driving in. A lot of consumer radios look tough but don't have the vibration dampening or heat handling needed for a day on corrugated gravel. Equipment sold here needs to meet the AS/NZS 4365 standard and carry an R-NZ compliance mark.
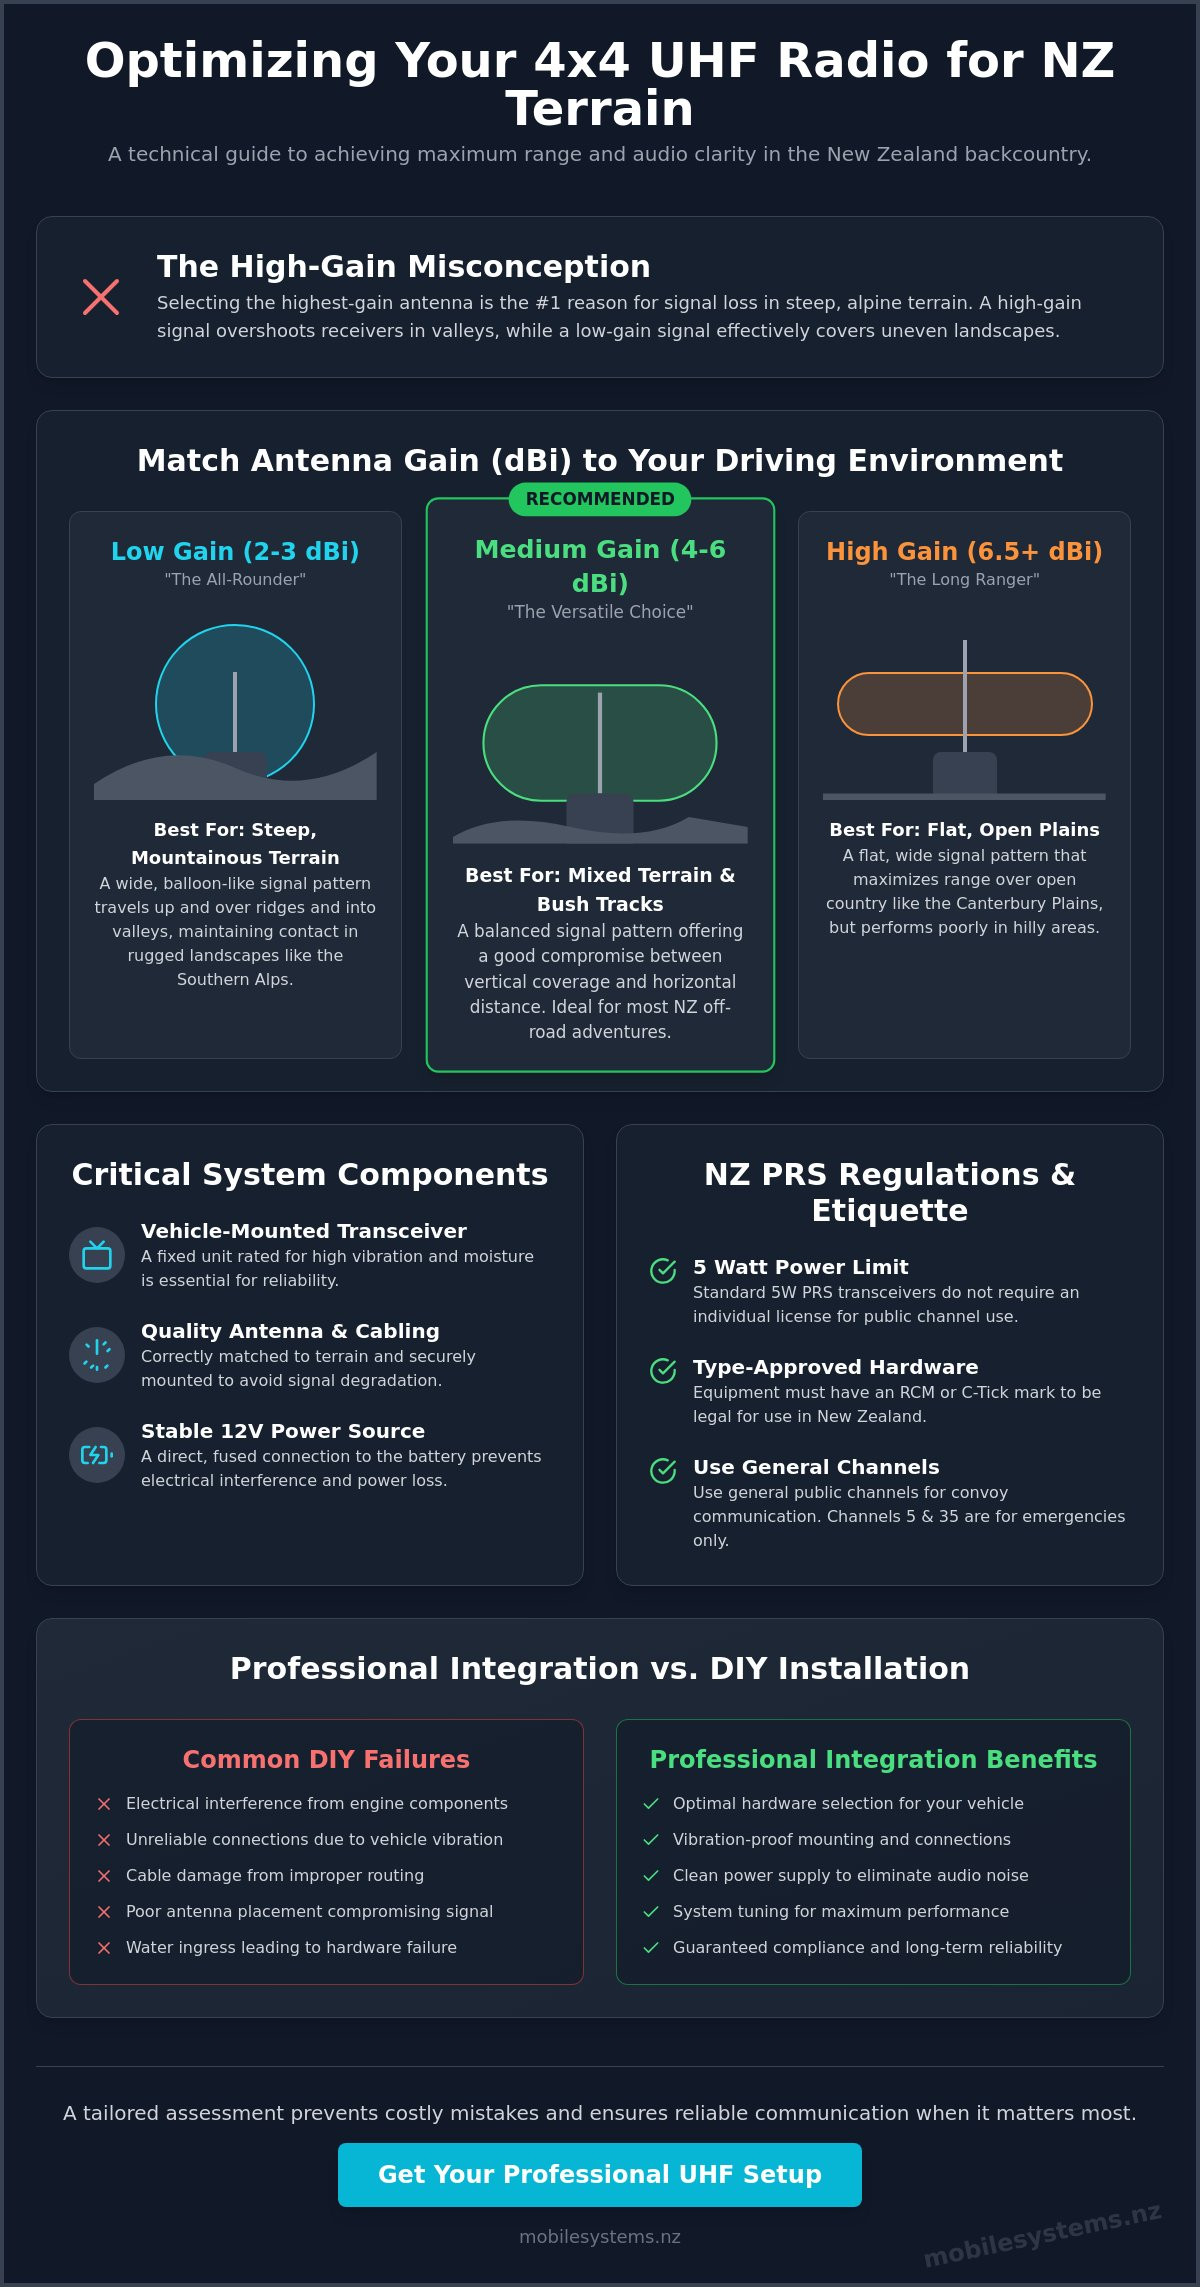
Antenna Gain (dBi): The Part Everyone Gets Wrong
Antenna gain, measured in dBi, describes how the signal is shaped, not how powerful it is. Think of it like a torch beam. A low-gain antenna spreads light in a wide, soft circle. A high-gain antenna squeezes that same light into a tight, far-reaching beam.
A low-gain antenna, around 2 to 3dBi, produces a broad, almost ball-shaped signal. That's ideal for hilly or bush terrain, because the signal can travel up and over rises rather than punching straight through them. A mid-gain antenna around 6 to 6.6dBi flattens that pattern out, trading some of the "up and over" coverage for extra distance on open ground.
The trade-off is real. A high-gain antenna optimised for flat, open touring can actually overshoot a vehicle that's sitting at a different elevation to you on a steep track, because the signal is now travelling in a flatter, narrower band. Plenty of serious 4x4 setups carry a low-gain whip for the bush and a higher-gain option for the open road, and swap between them depending on where they're headed.
| Antenna gain | Signal pattern | Best suited to |
|---|---|---|
| 2 to 3dBi (low) | Broad, balloon-shaped, travels "up and over" terrain | Hilly country, dense bush, varying elevation between vehicles |
| 6 to 6.6dBi (mid) | Flatter, more horizontal pattern | Mixed terrain, the practical default for most NZ driving |
| High gain (9dBi+) | Narrow, long horizontal throw | Flat, open touring country with few elevation changes |
If you're after a real-world starting point, the GME AE4002 (2.1dBi) is a sensible low-gain option for hilly or bush-heavy driving, while the GME AE4018 (6.6dBi) is a solid middle ground for mixed terrain. If most of your driving is genuinely flat and open, a higher-gain antenna is worth discussing with our team so we can match it properly to your vehicle and route.
Fixed Mount vs Handheld Radios
A proper 4x4 UHF radio setup is built around a fixed-mount transceiver, wired straight to the battery. That gives you a consistent 5W output without draining an internal battery, and lets you run a proper external antenna, which is the single biggest factor in your actual range. Units like the GME XRS-330CTP Touring Pack and the GME XRS-390C are purpose-built for exactly this kind of touring setup.
Handhelds have their place too, mainly for recovery spotting or talking to someone outside the vehicle. Their smaller antennas and lower effective range mean they shouldn't be your primary vehicle-to-vehicle link, but as a backup or a spotter's tool, they're genuinely useful.
Don't overlook ergonomics either. A speaker-mic handpiece with everything on it, channel selector included, is far easier to use one-handed with gloves on than fumbling for a separate display unit. A proper hardware assessment with our team will save you from buying gear that looks good on a spec sheet but is a pain to actually use on the track.
Professional Installation Standards for Off-Road Reliability
Good hardware installed badly is still a bad setup. New Zealand's corrugated tracks and river crossings will find every weak point in a DIY install, usually at the worst possible time. A professional install focuses on two things: physical durability and electrical integrity.
Power and Noise
Direct-to-battery wiring with an inline fuse is the standard, full stop. Drawing power from a cigarette lighter socket might be quicker, but it introduces electrical noise and voltage drops that will eat into your transmit power right when you need it most. The fuse should sit as close to the battery as possible to protect your vehicle's wiring.
Alternator whine is the classic symptom of a rushed install. It's that high-pitched buzz that rises and falls with engine RPM and makes your transmissions hard to understand. Shielded power cable and a solid chassis earth usually sort it. If it persists, a dedicated power filter isolates the radio from the charging system altogether.
Antenna Mounting
Where you mount the antenna affects your range more than almost anything else. Bull bar mounts are the popular choice because they're easy to route cable to and they're protected from the worst of it, but the vehicle's own cabin can block signal in certain directions. Roof mounts give a cleaner 360-degree pattern but take more of a beating from overhanging branches in NZ bush.
Cable routing matters just as much as the mount itself. Keep coax away from heat and high-current wiring, and avoid sharp bends, since a kinked cable changes its impedance and can push your Standing Wave Ratio (SWR) high enough to damage the radio's transmitter over time. Run it through proper grommets where it crosses the firewall, and you'll avoid the slow chafing that eventually lets moisture in.
None of this is complicated in isolation. It's getting all of it right, every time, across a vehicle that's about to spend its life being shaken apart on backcountry roads, that separates a setup that lasts from one that doesn't.
UHF Channel Etiquette and NZ Regulations, Properly Explained
Here's where a lot of online advice, including some of what's floating around about NZ UHF setups, gets it wrong. New Zealand's channel conventions are not identical to Australia's, even though both countries share the same 80-channel UHF CB band. Mixing the two up isn't just a technicality. It changes how you should actually use your radio.
The Channel 5/35 Mix-Up
In Australia, channels 5 and 35 are designated, legislated emergency channels, and misuse is taken seriously. In New Zealand, channels 5 and 35 are simply a repeater output and input pair, like the other seven repeater pairs on the band. New Zealand has no government-designated UHF emergency channel in the same way Australia does.
What that means in practice: if you're in trouble in the New Zealand backcountry, channel 5 isn't guaranteed to be monitored by anyone. Your best move is to scan across the active channels for anyone nearby, try the road or local convoy channel if you know it, and treat a UHF radio as one part of your safety plan rather than a guaranteed emergency line. For genuine off-grid emergencies, pairing UHF with a personal locator beacon or satellite device is the safer approach.
Channel 11 and the Repeater Channels
Channel 11 is the call channel under the shared standard, the spot you use to find someone before agreeing on a different channel to actually talk on. Channels 1 to 8 and 41 to 48 are repeater pairs. Switch your radio to "Duplex" or "Repeater" mode on these channels to bounce your signal off a hilltop repeater station and extend your range well beyond line-of-sight.
Channels 22 and 23 are reserved for data and telemetry only. Voice transmissions aren't permitted on them, so leave them alone for general chat.
- Channels 1 to 8 and 41 to 48: Repeater (duplex) channels for extended range via hilltop stations.
- Channel 11: The call channel. Make contact, then move to a clear channel to talk.
- Channels 22 & 23: Data and telemetry only. No voice traffic.
- Channels 5 & 35: Repeater pair in New Zealand, not a designated emergency channel as in Australia.
Convoy Etiquette and Sharing the Road
A radio check before you leave the trailhead is good practice every time. It confirms the whole convoy can hear and be heard before you're committed to the track. Use short, clear language for hazards. "Clear on the left" or "slip at the next bend" beats a long-winded explanation when someone needs to react fast.
You'll often share forestry and backcountry roads with logging trucks and other commercial operators. Many of these roads have their own informal channel that drivers monitor, sometimes signposted at the track entrance. Listen before you transmit, give way to the trucks, and announce your position clearly on narrow tracks. If you're not certain your current setup meets current standards, our technical team can run a quick compliance check for you.
Why Professional Integration Beats a DIY Install
Plenty of people have a go at fitting their own UHF radio, and plenty of those installs work fine for a while. The problems tend to show up later: a flat battery from a parasitic drain nobody noticed, a coax cable chafed through after a season of corrugations, or a signal that's noticeably worse than it should be because the antenna gain was never matched to the terrain.
A professional install accounts for your vehicle's specific electrical setup and physical mounting points from the start, which is the difference between a system that holds up over multiple seasons and one that needs constant troubleshooting.
Beyond the Radio: A Complete Comms Plan
UHF is brilliant for vehicle-to-vehicle contact, but it has real limits. It won't reach a medical emergency call out of a deep alpine valley. If you're regularly heading somewhere properly remote, pairing your UHF setup with a satellite device or personal locator beacon gives you a genuine backup when terrestrial coverage and repeaters are both out of reach.
For commercial operators running fleets rather than weekend tracks, integrating GPS fleet tracking alongside your UHF setup adds real-time visibility and a stronger worker safety net, particularly for teams working solo in remote areas.
What We Actually Do
Based in Mount Maunganui, our team has fitted enough of these systems across the Bay of Plenty and beyond to know where they usually go wrong. We test Standing Wave Ratio properly, tune the antenna to your specific vehicle's ground plane, and make sure the fuse, earth and cable routing are done once and done properly.
That's the difference between a setup that performs on day one and one that still performs three years and a hundred river crossings later.

